
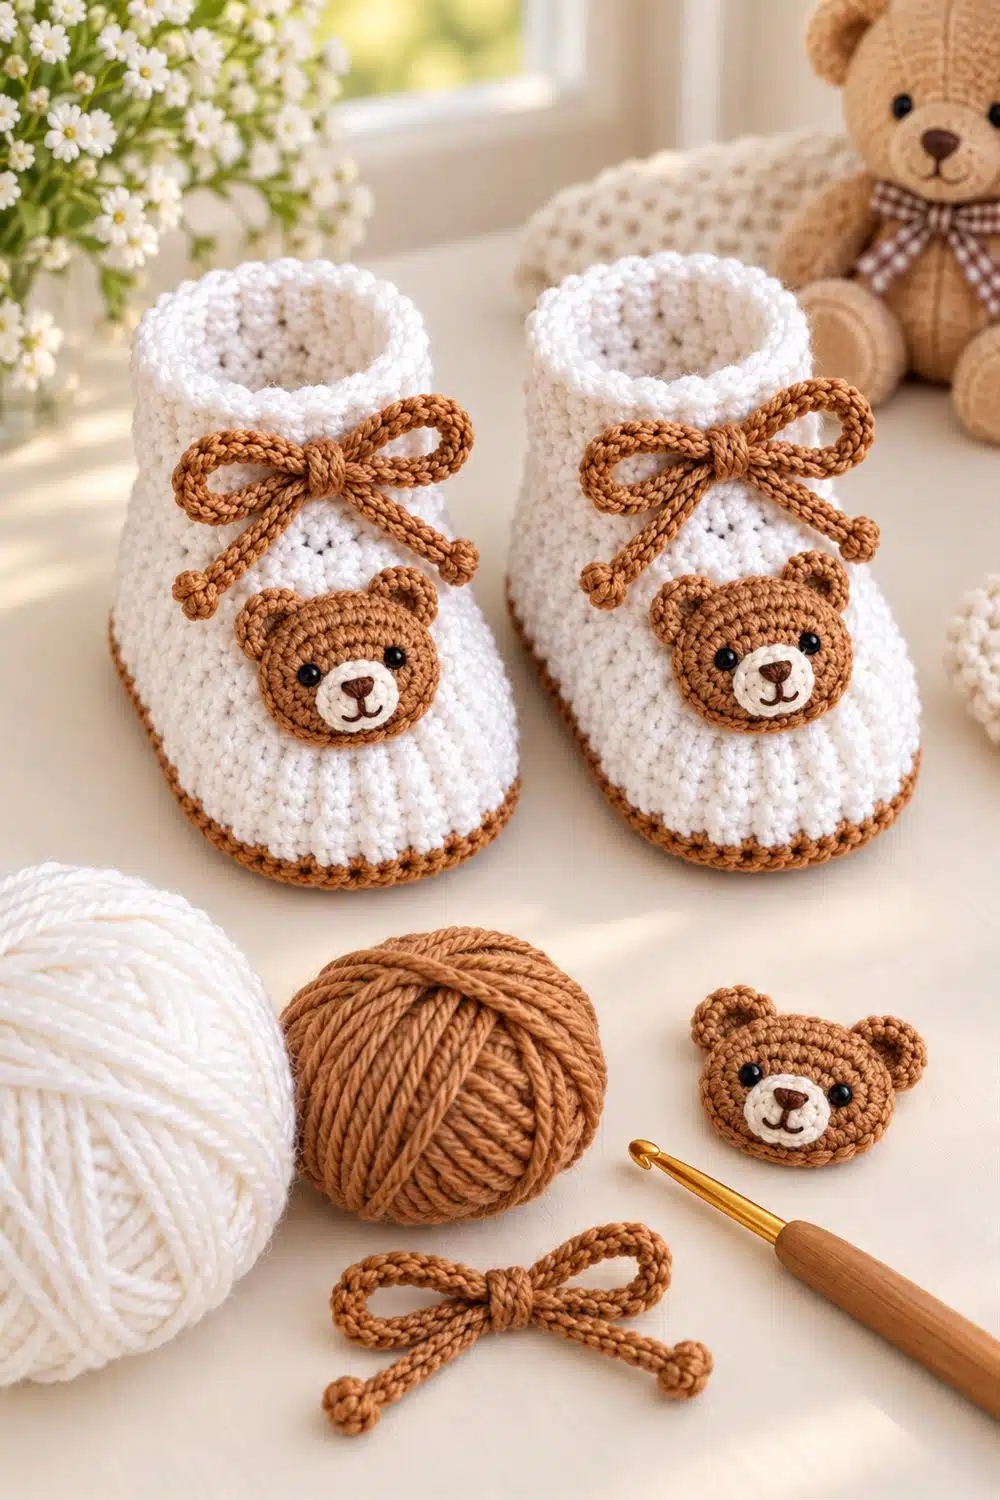
Create an adorable pair of teddy bear crochet baby booties with soft white yarn, warm brown edging, cute teddy bear faces, and decorative crochet bows. These handmade booties make a lovely baby shower gift, newborn photography accessory, or special handmade present.
This beginner-friendly tutorial includes materials, abbreviations, a written crochet pattern, assembly instructions, and photo prompts for every major step.
Skill level: Beginner to easy intermediate
Suggested size: Approximately 0–3 months
Finished length: Approximately 8–9 cm (3.1–3.5 inches), depending on yarn and tension
Crochet terminology: US terms
Main colors: White and caramel brown
Construction: Two booties, two soles, two uppers, two teddy bear appliqués, and two bows
Important: Baby feet vary in size. Measure the baby’s foot and adjust the sole length as needed. This is an original, photo-inspired pattern, not a verified reconstruction of the exact stitches in the reference image.
Materials You Will Need
- White DK or light worsted-weight baby yarn
- Caramel-brown or tan yarn
- Small amount of dark-brown yarn for the teddy bear nose and mouth
- Crochet hook suitable for your yarn, approximately 3.0–3.5 mm
- Two pairs of securely attached black safety eyes, or black embroidery thread
- Yarn needle
- Stitch markers
- Scissors
- Measuring tape
- Optional: polyester stuffing for the teddy bear muzzle, used sparingly
Baby safety note: For newborns and young babies, embroidered eyes and securely embroidered facial details are generally safer than detachable plastic parts. Avoid loose ribbons, long cords, buttons, and other detachable decorations. Supervise wear and inspect the booties regularly.
Crochet Abbreviations
| Abbreviation | Meaning |
|---|---|
| ch | Chain |
| sl st | Slip stitch |
| sc | Single crochet |
| hdc | Half double crochet |
| dc | Double crochet |
| inc | Increase: 2 stitches in one stitch |
| dec | Decrease: crochet 2 stitches together |
| st / sts | Stitch / stitches |
| BLO | Back loop only |
| MR | Magic ring |
| rep | Repeat |
| rnd | Round |
Work in continuous rounds unless the instructions tell you to join. Use a stitch marker to identify the first stitch of each round.
Step 1: Crochet the White Sole
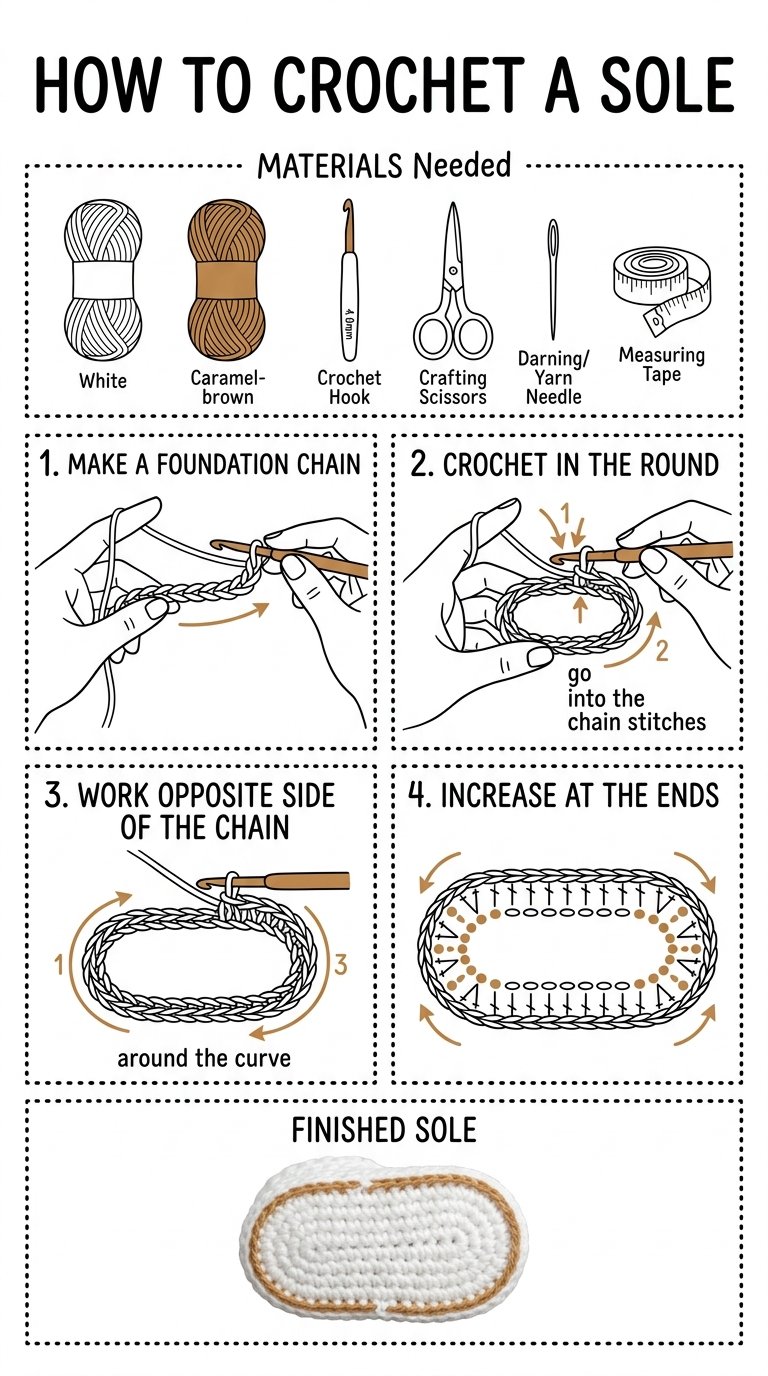
Make two matching soles using white yarn.
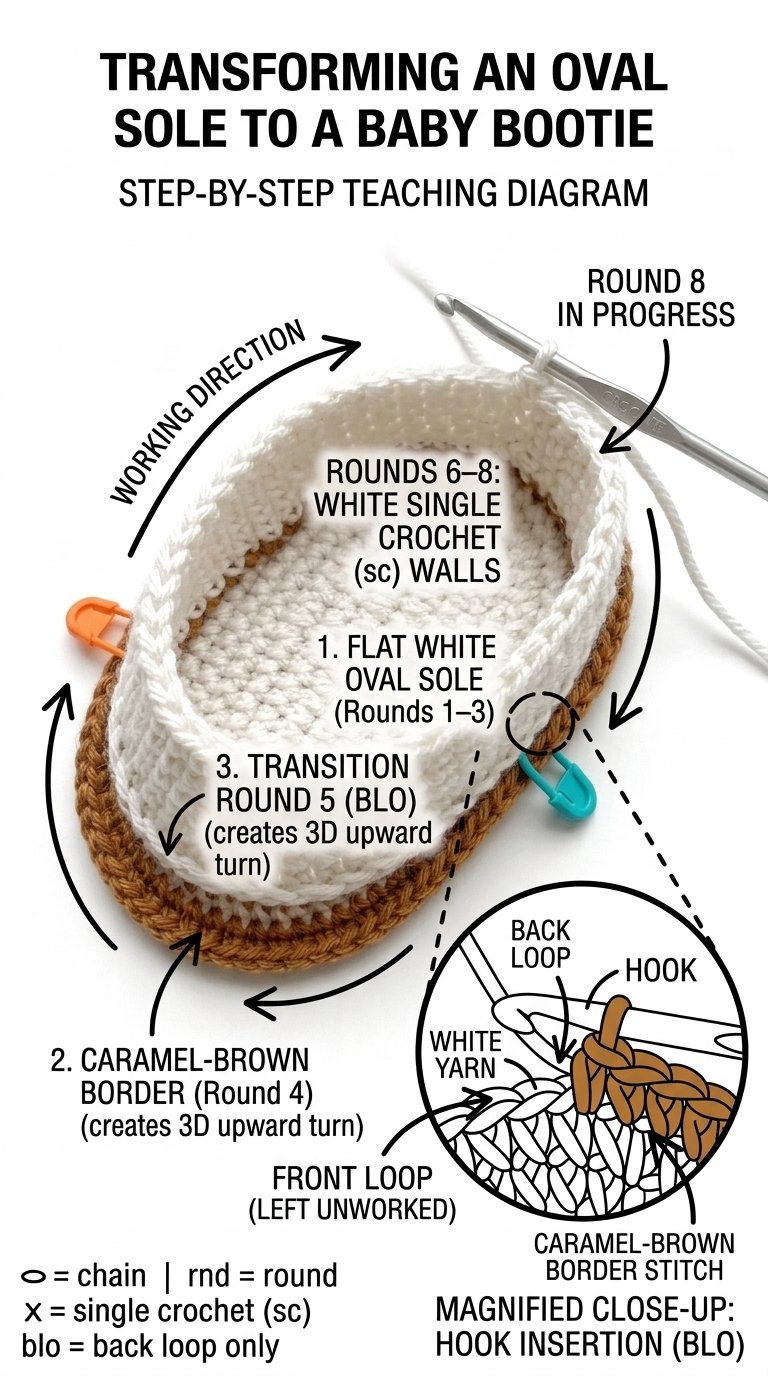
Round 1: Ch 11. Sc in the second ch from the hook and in the next 8 ch. Work 4 sc in the last chain. Working along the opposite side of the foundation chain, sc in the next 8 available chain loops, then work 3 sc in the remaining end loop. Join with a sl st if you prefer joined rounds.
Round 2: Ch 1. Work sc around the oval, increasing evenly around both rounded ends to create a smooth sole. Aim for approximately 32 stitches.
Round 3: Continue increasing around the toe and heel ends, keeping the long sides mostly even. Aim for approximately 40 stitches.
Adjust the increases to keep the sole flat. The final sole should be an oval with a rounded toe and heel rather than a bowl shape.
Step 2: Add the Brown Sole Border
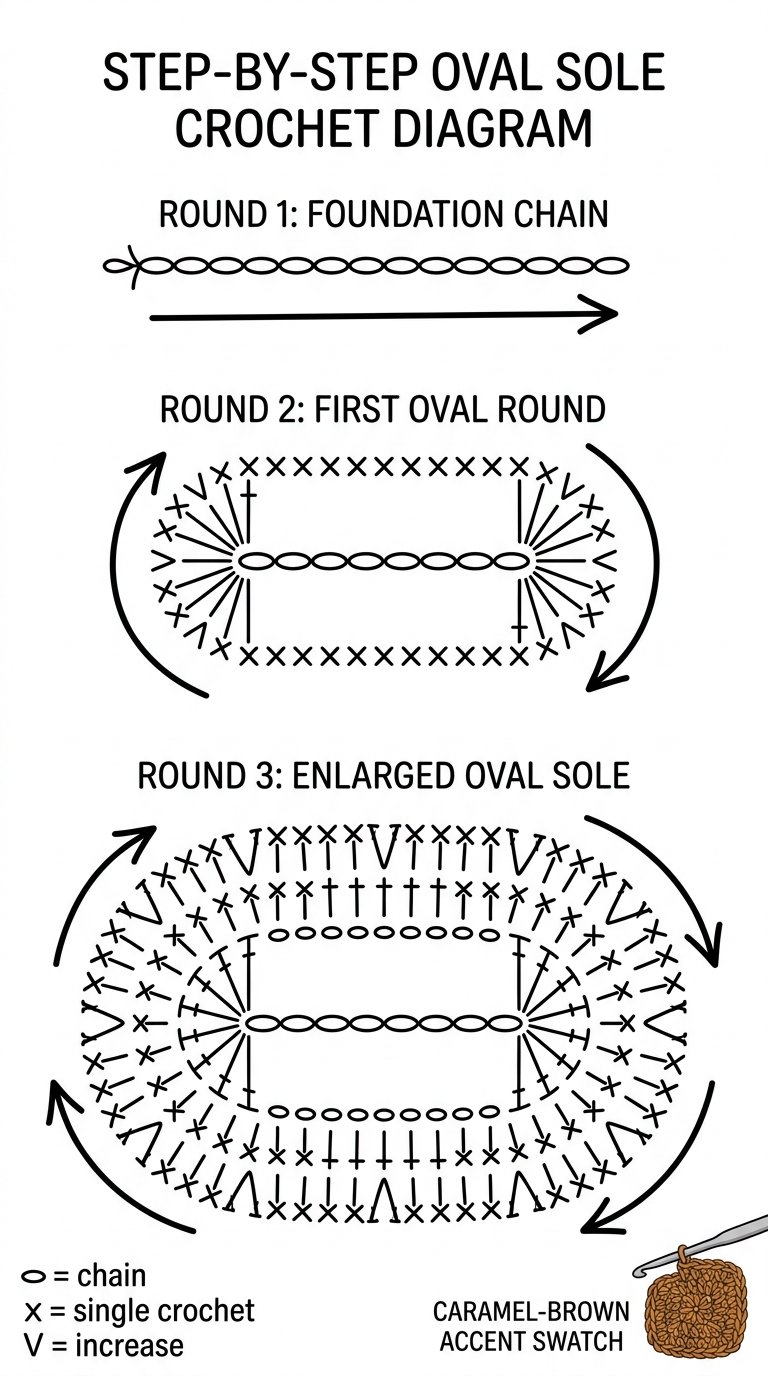
Attach caramel-brown yarn at the heel.
Round 4: Work one round of sc around the sole, placing one stitch in each stitch. Keep your tension even and join with a sl st.
Optional raised edge: Work another round of sc in BLO for a subtle ridge.
Check that the brown border lies flat and that both soles are the same size.
Step 3: Build the White Bootie Upper
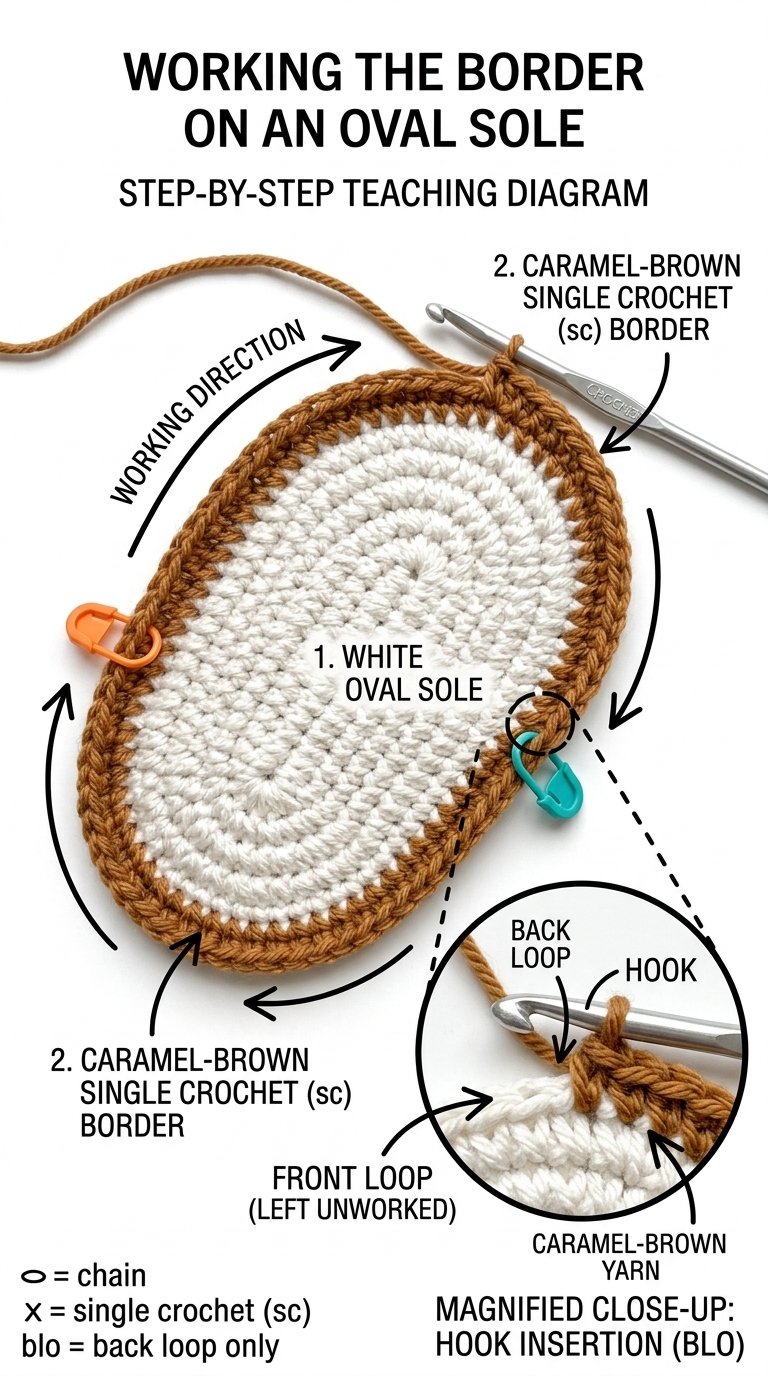
Attach white yarn to the back center of the sole.
Round 5: Work one round of sc in BLO around the sole. This creates a clear corner between the bottom and the sides.
Rounds 6–8: Work one sc in each stitch around without increasing. The fabric should begin to rise and form the bootie walls.
Try the bootie against the baby’s foot measurement or a paper foot template. The upper should be deep enough to hold the foot comfortably without being excessively tight.
Step 4: Shape the Rounded Toe
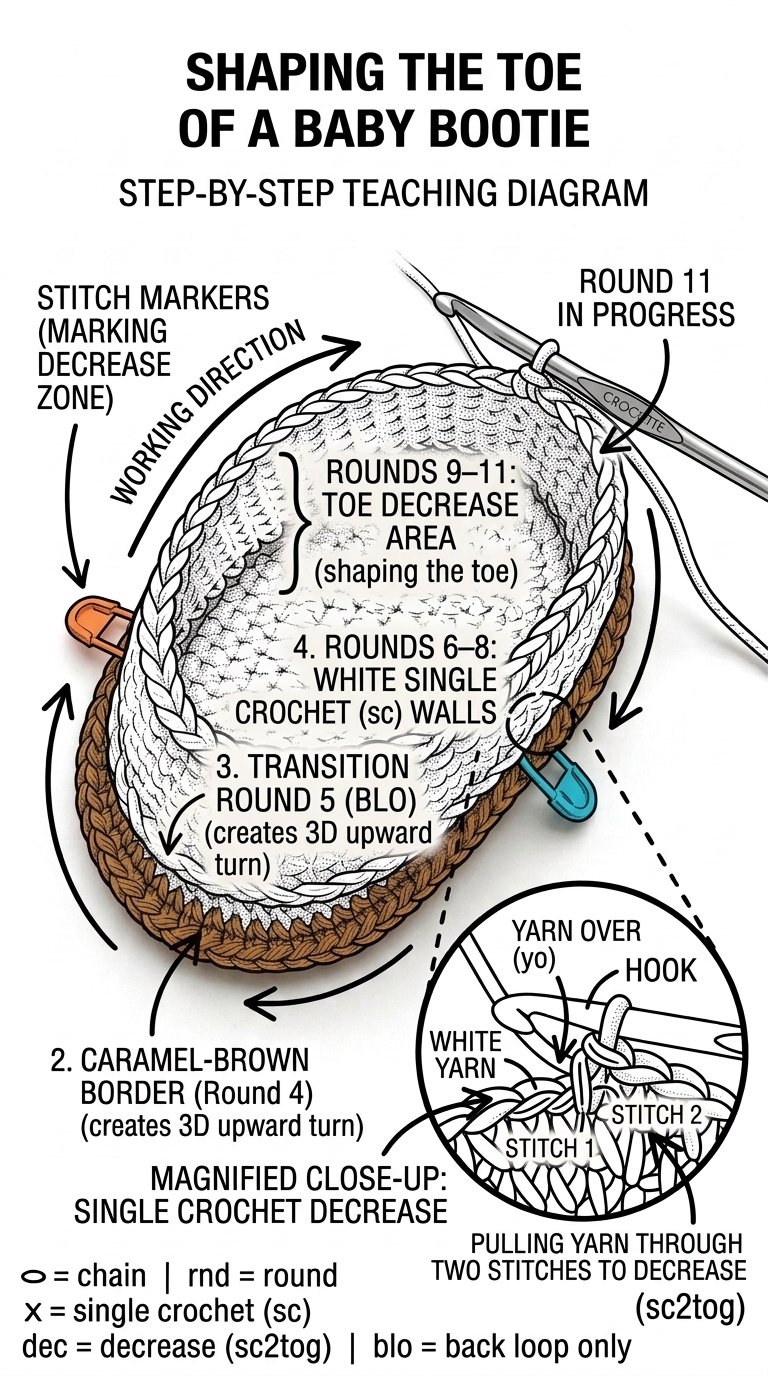
Mark the center front of the bootie.
Round 9: Sc around the heel and side sections. Across the front toe section, work approximately 6 evenly spaced decreases.
Round 10: Repeat the toe decreases if necessary, keeping the heel and side stitches even.
Round 11: Work one round of sc around the opening to smooth the edge. Fasten off and weave in the ends.
The toe should be softly rounded, not sharply pointed. If the opening is too narrow, remove one decrease round.
Repeat the same process for the second bootie.
Step 5: Crochet the Teddy Bear Face
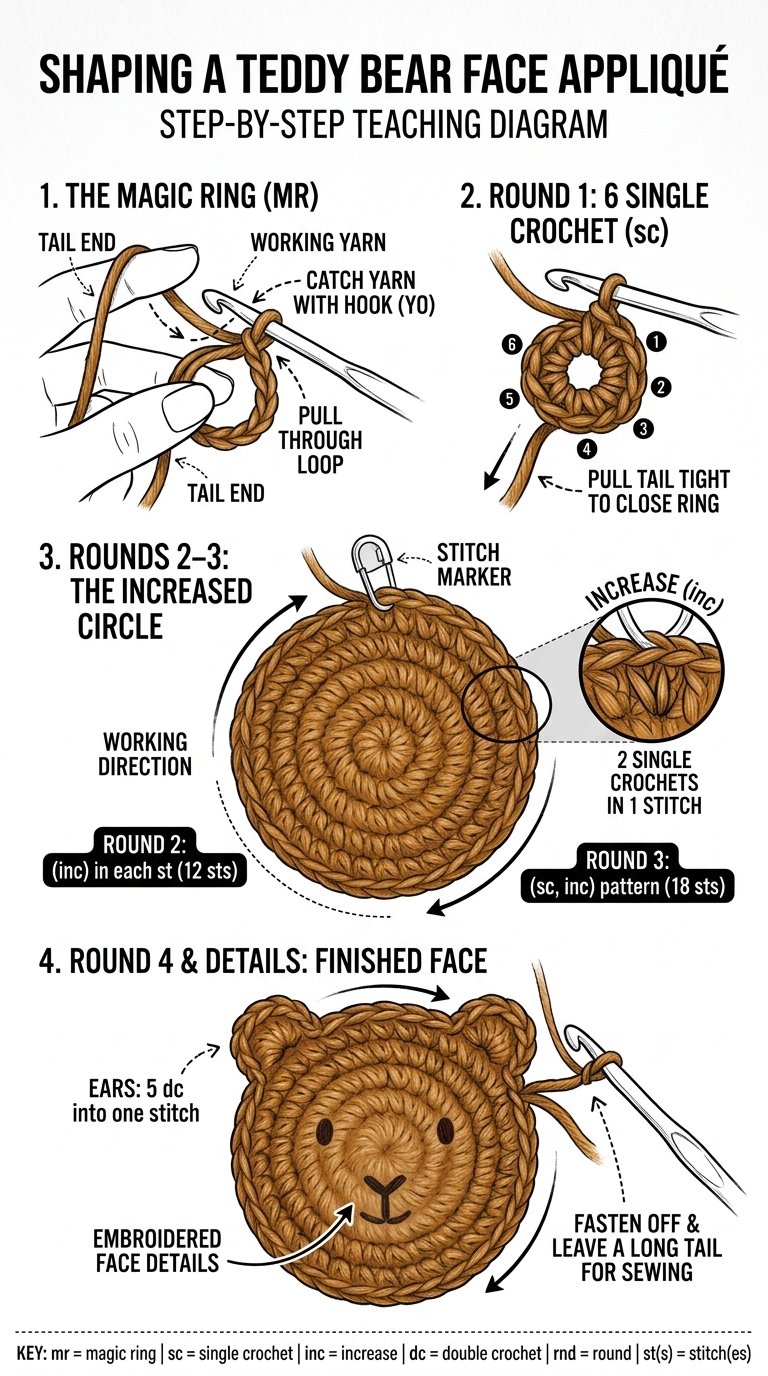
Make two faces using caramel-brown yarn.
Round 1: Make a magic ring and work 6 sc into the ring. Pull tight.
Round 2: Work 2 sc in every stitch around. (12 sts)
Round 3: Rep 1 sc, inc around. (18 sts)
Round 4: Rep 2 sc, inc around. (24 sts)
Join and fasten off, leaving a long tail for sewing.
Flatten the circle gently into a rounded teddy bear face. If needed, add one extra increase round to make the face larger.
Step 6: Make Two Teddy Bear Ears
Make four small ear pieces, two for each teddy bear.
Round 1: With brown yarn, make a magic ring and work 6 sc into it. Join with a sl st.
Round 2: Ch 1 and work 2 sc in each stitch around. (12 sts)
Fasten off, leaving a sewing tail.
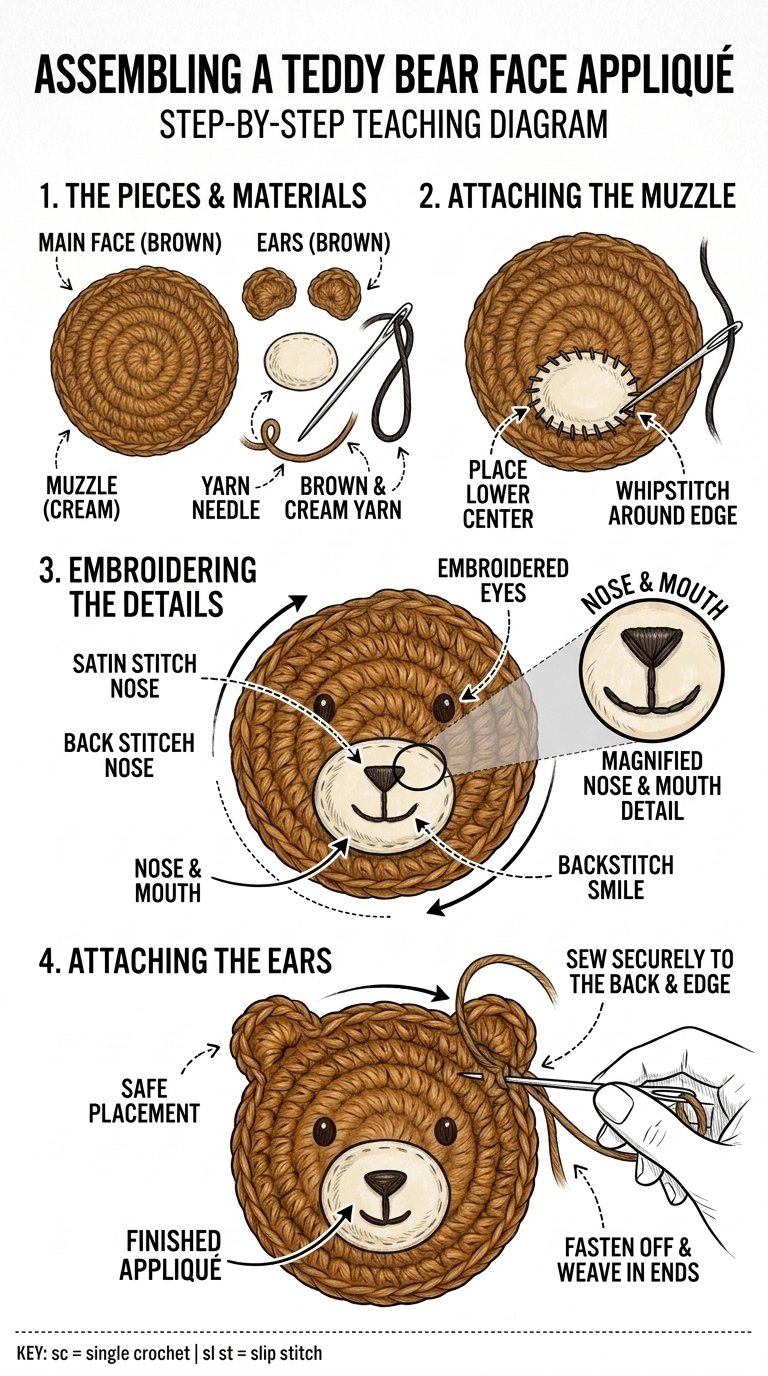
Flatten each ear slightly. Sew two ears to the upper left and upper right sides of each bear face, shaping them into small rounded bumps.
Step 7: Crochet the Cream Muzzle
Use cream or off-white yarn.
Round 1: Make a magic ring and work 6 sc into it.
Round 2: Work 2 sc in every stitch around. (12 sts)
Round 3: Rep 1 sc, inc around. (18 sts)
Fasten off with a long tail. Flatten the muzzle into a small oval and sew it onto the lower center of the bear face.
Use dark-brown yarn to embroider a small triangular nose and a short vertical line ending in a gentle smile. Add the eyes using secure embroidery.
Step 8: Crochet the Decorative Brown Bows
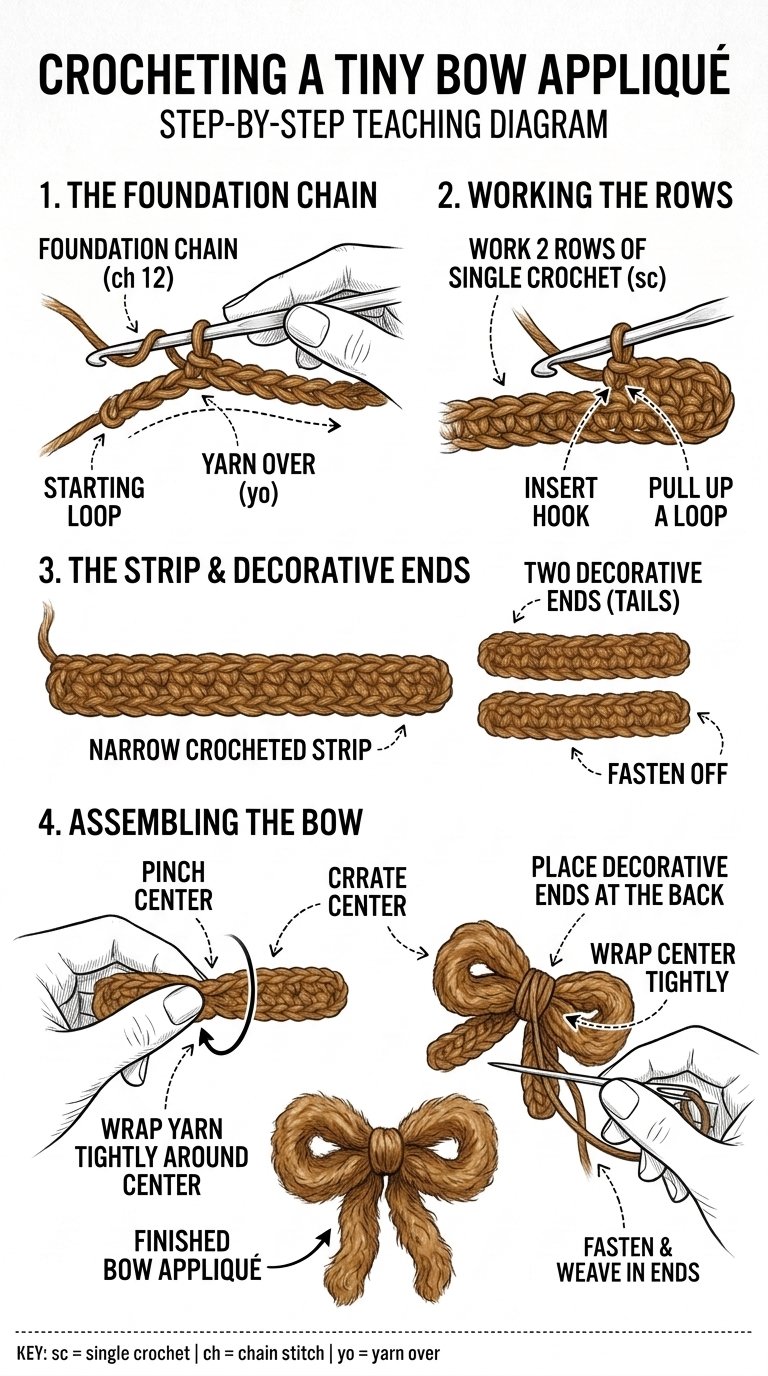
Make two bows with caramel-brown yarn.
Foundation: Ch 22.
Row 1: Sc in the second ch from the hook and across. (21 sc)
Row 2: Ch 1, turn, and sc across. (21 sc)
Fasten off, leaving a long tail.
Bring the two short ends together to form a looped bow shape. Pinch the center and wrap the yarn tail several times around it. Secure the wrap on the back.
For the dangling ends, make two separate chains of approximately 10–12 stitches each, adding a small knot or a few stitches at the tips if desired. Attach the ends securely to the back of the bow.
Keep the finished bow small and decorative. For babies, embroider the bow shape directly onto the bootie instead of using loose cords or detachable ties.
Step 9: Assemble the Teddy Bear Booties
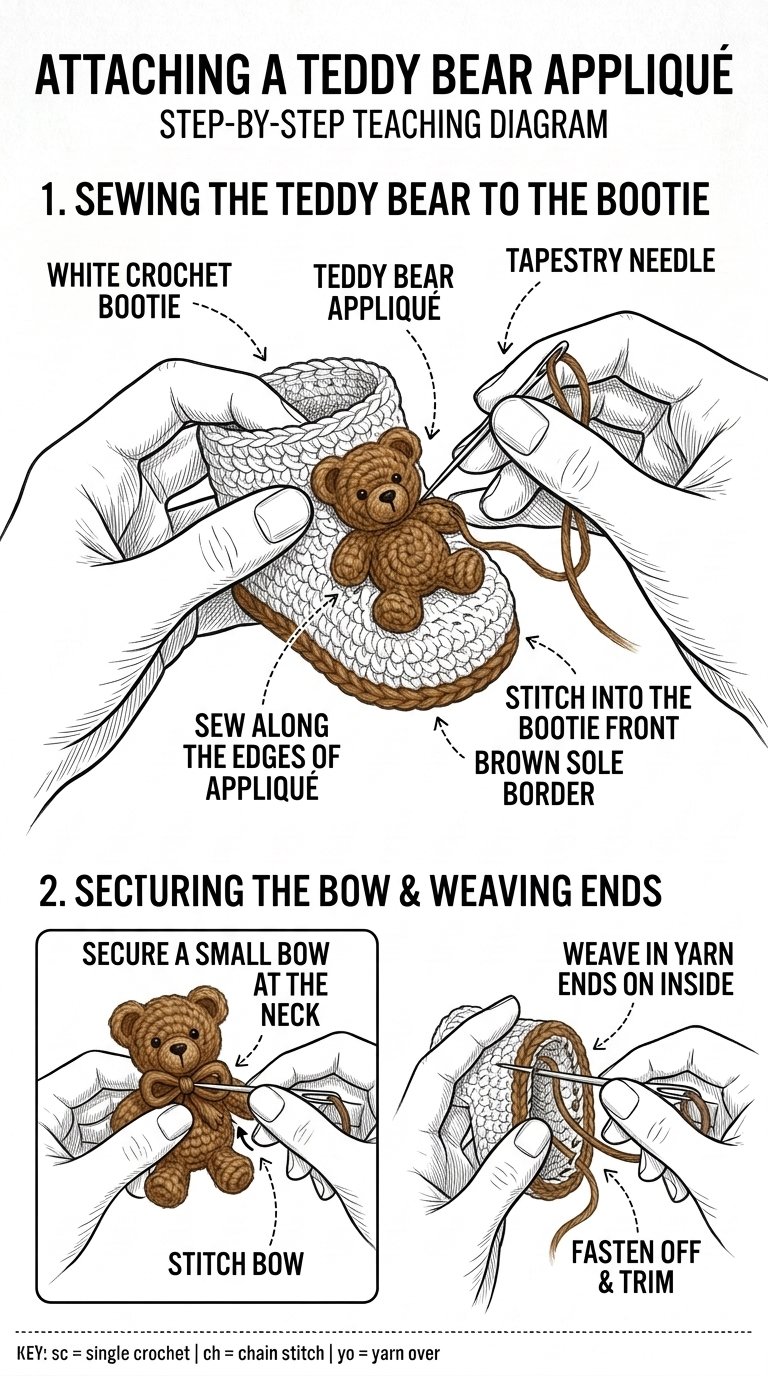
Lay both booties side by side and check that their toes point in the same direction.
- Position one teddy bear face on the front of each bootie.
- Sew around the face with small, secure stitches.
- Check that both ears and muzzles are firmly attached.
- Place each bow near the top front of the bootie.
- Secure the bow with several stitches or embroider a bow directly onto the upper.
- Weave in all loose yarn ends.
- Check both booties for matching size, shape, and decoration.
Do not use glue as the primary attachment method for baby items.
Step 10: Final Finishing and Quality Check
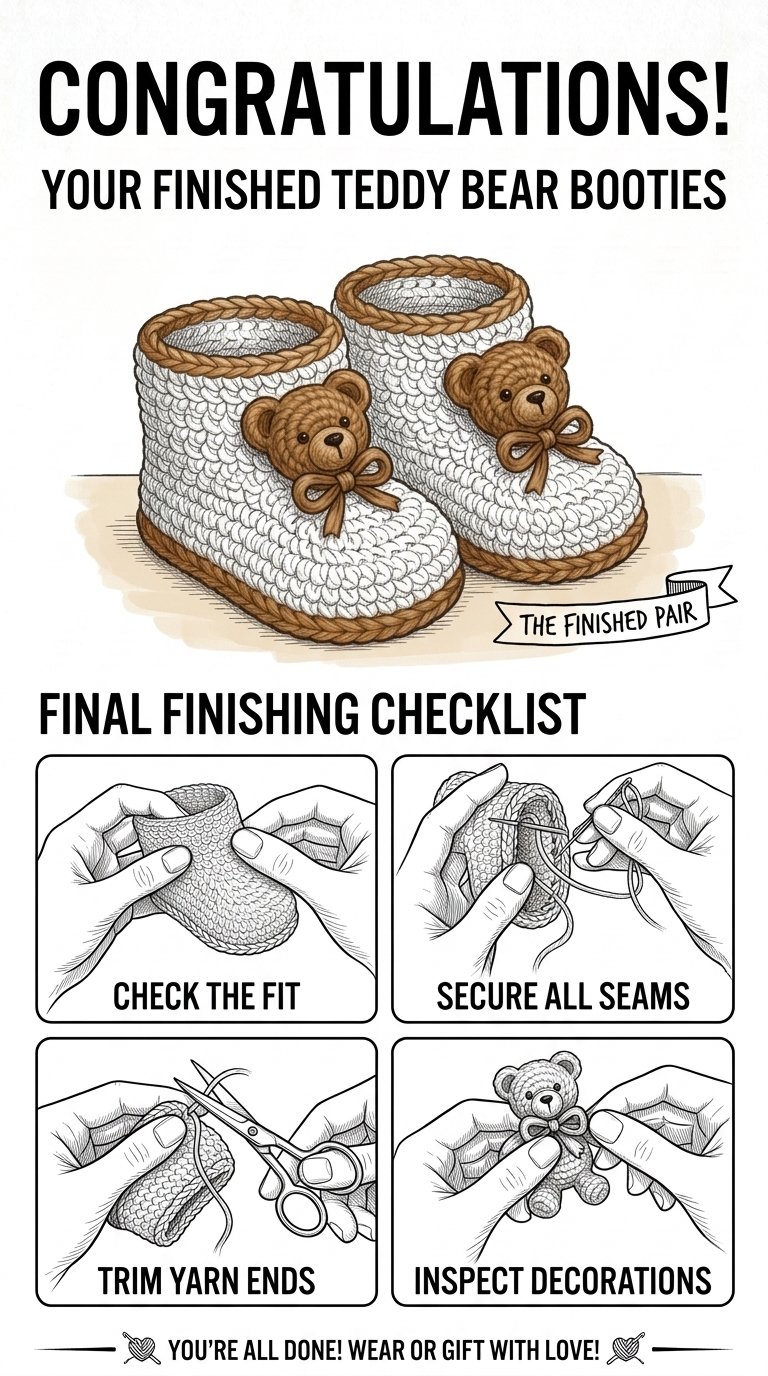
Your teddy bear crochet baby booties are nearly ready!
- Check the sole length and opening against the intended baby’s measurements.
- Make sure both booties are approximately the same size.
- Inspect the bear faces, ears, and bows for loose stitches.
- Confirm that there are no loose cords, sharp pieces, or detachable parts.
- Gently shape the booties by hand.
- Follow the yarn label’s washing instructions and dry them completely before use.
Your finished pair should feature a white textured body, caramel-brown sole edging, a friendly teddy bear face, and a matching bow.
Tips for the Best Results
Keep the stitches tight and even. A smaller hook may help create a neat fabric, but the booties should never feel stiff or uncomfortable.
Use stitch markers. Oval soles and toe decreases are easier to follow when the beginning of each round is clearly marked.
Make the second bootie a match. Write down any adjustments you make to the first bootie and repeat them on the second.
Choose baby-friendly yarn. Soft, washable yarn is practical for items that may need frequent cleaning.
Test the fit. The measurements are estimates, not guaranteed age-based sizing. Measure the foot before making the final pair.
Frequently Asked Questions
Are these teddy bear crochet booties suitable for beginners?
Yes. The pattern uses basic stitches such as chains, single crochet, increases, and decreases. Beginners should be comfortable with working in the round and sewing small pieces together.
What yarn is best for baby booties?
Soft, washable baby yarn is a good choice. DK-weight yarn is suitable for a lightweight pair, but the finished size depends on the yarn, hook, and individual tension.
Can I make these booties in other colors?
Absolutely. Try cream and dusty pink, white and sage green, beige and chocolate brown, or pastel blue and ivory.
How do I make the booties larger?
Use the baby’s foot measurement as your guide. Increase the foundation chain and adjust the oval sole rounds while keeping the toe rounded. A thicker yarn and larger hook may also increase the finished size, but always check the measurements.
Can I sew the teddy bear face onto the booties?
Yes. Sewing is a good way to attach crochet appliqués. Use small, secure stitches and weave the ends in carefully. For baby items, avoid detachable plastic eyes and loose decorative cords.
How long does this crochet project take?
The time varies with your experience. A beginner may need several hours to crochet both booties, make the faces and bows, and sew everything securely.
How should I wash handmade crochet baby booties?
Follow the yarn manufacturer’s care instructions. If machine washing is permitted, use a gentle cycle and a laundry bag. Dry thoroughly and inspect all sewn details before reuse.
Can I sell booties made from this pattern?
You may choose to sell finished handmade booties, subject to applicable product-safety requirements. If you publish this tutorial, use your own photographs and wording, and do not claim that the reference image proves an exact original stitch pattern.
Final Thoughts
These teddy bear crochet baby booties combine a simple white crochet base with warm brown details for a sweet handmade finish. Take your time with the oval soles, shape both toes evenly, and sew the bear faces securely for a polished result.
Save this pattern for your next baby shower gift or handmade nursery project, and experiment with different yarn colors to create your own adorable variations.