
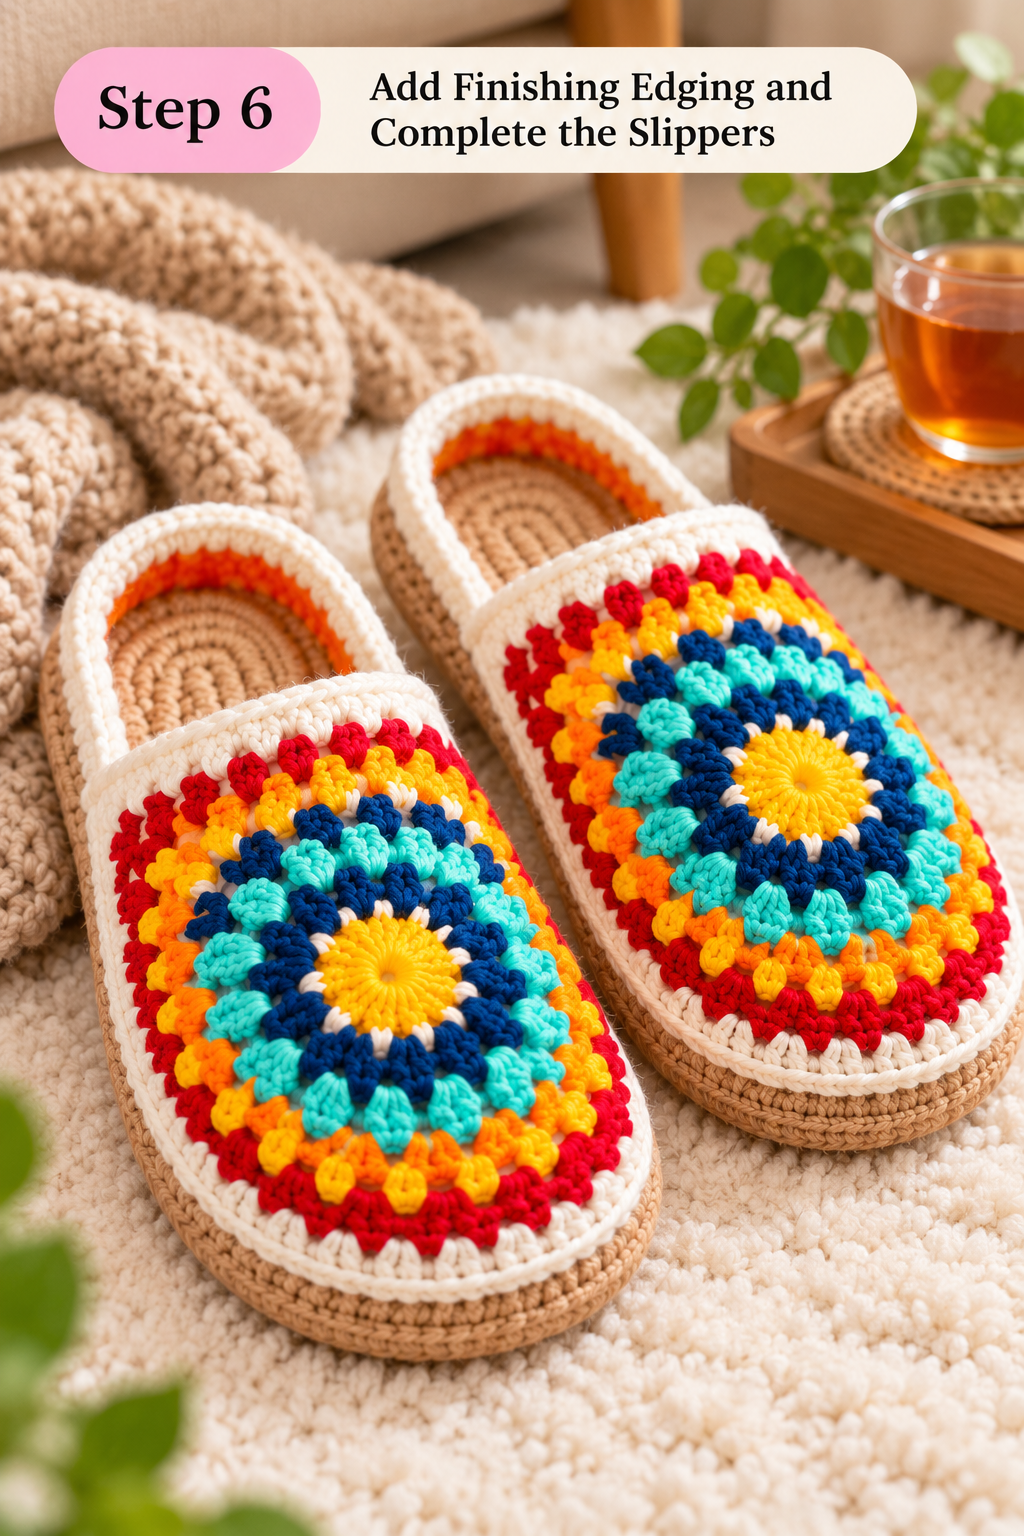
Handmade crochet slippers are one of the most satisfying and practical projects for any crochet lover. They are cozy, beautiful, and highly customizable. The colorful granny-style slippers shown in your 6-step collage combine the charm of classic crochet motifs with the comfort of indoor house shoes. Their bright circular design, cream edging, and easy slip-on shape make them ideal for personal use, gifts, or even handmade product listings.
In this tutorial, you will learn how to create these crochet slippers step by step. The process begins with a round colorful motif, which is then shaped into the upper part of the slipper. After that, the upper is attached to a sole, joined neatly, and finished with edging to create a polished pair of cozy indoor slippers. This tutorial is written in a clear and practical way so that beginners with basic crochet knowledge can also follow it.
Materials Needed
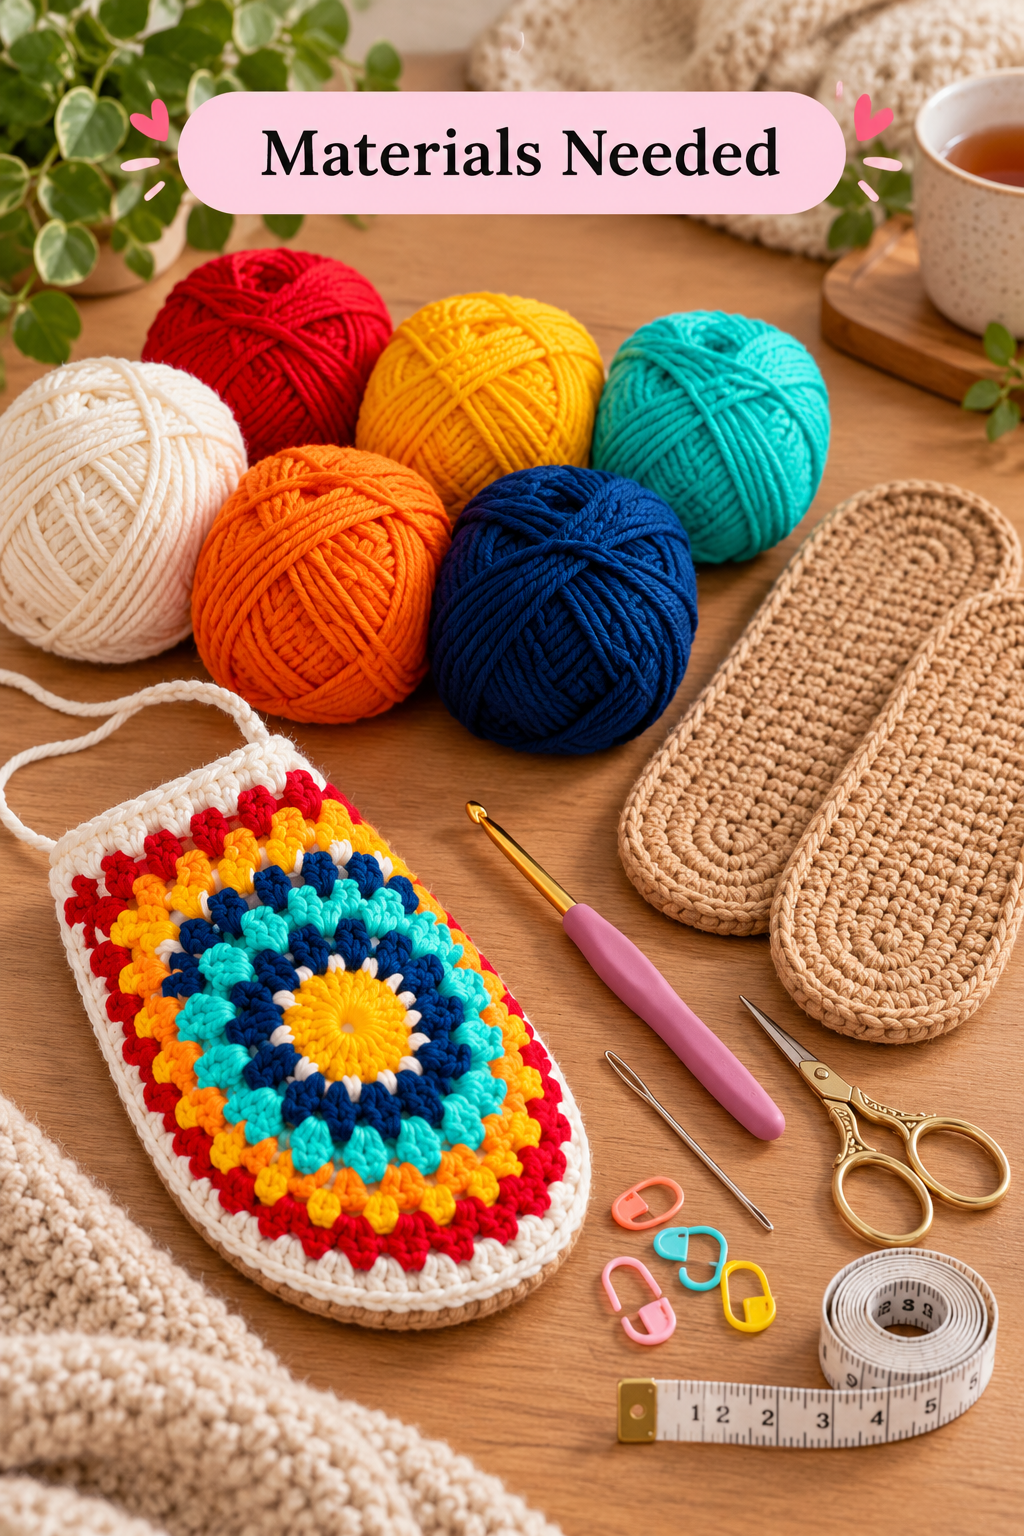
To make one pair of colorful crochet granny slippers, you will need:
- Worsted weight yarn or soft cotton yarn in multiple colours
- Red
- Navy blue
- Yellow
- Orange
- Turquoise
- White or cream
- Purple or pink for variation
- Crochet hook suitable for your yarn, usually 4 mm to 5 mm
- Tapestry needle
- Scissors
- Stitch markers
- Ready-made slipper soles, foam soles, or thick crochet soles
- Optional felt, anti-slip sole fabric, or rubber sole inserts
- Measuring tape
Abbreviations Used
- ch = chain
- sl st = slip stitch
- sc = single crochet
- hdc = half double crochet
- dc = double crochet
- tr = treble crochet
- inc = increase
- st = stitch
- sp = space
- rep = repeat
Pattern Notes
This pattern is designed as a guide for adult medium size slippers. You can make them smaller or larger by changing the hook size, yarn thickness, or by adding/removing one shaping round from the upper.
Finished approximate size:
- Length: about 9.5 to 10 inches
- Width: about 3.5 to 4 inches
The slippers are made in two main parts:
- The decorative crochet upper
- The sole base
You will make two identical uppers and then attach them to the left and right soles.
Step 1: Make the Center Circle Motif
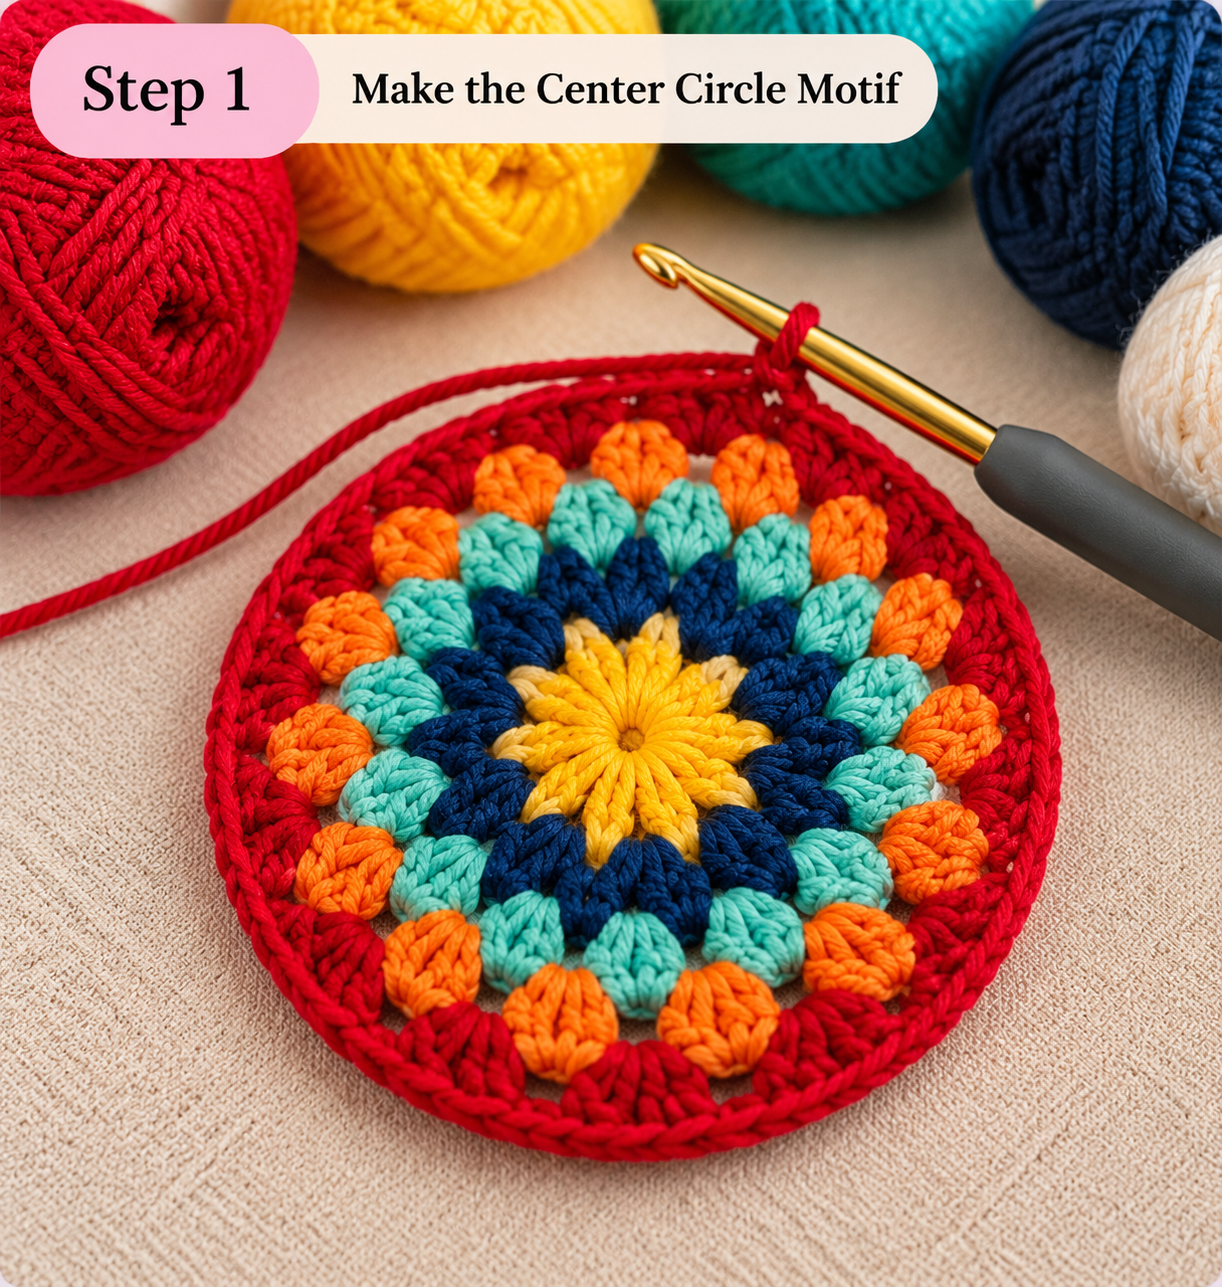
The first step is to crochet the colorful circular toe motif. This round motif forms the main decorative part of the slipper front.
Round 1:
Using yellow yarn, make a magic ring. Work 12 dc into the ring. Join with a sl st.
(12 dc)
Round 2:
Change to turquoise. Ch 2. Work 2 dc in each st around. Join with sl st.
(24 dc)
Round 3:
Change to white. Ch 2. 1 dc in next st, 2 dc in next st. Repeat around. Join.
(36 dc)
Round 4:
Change to red. Ch 2. 1 dc in next 2 sts, 2 dc in next st. Repeat around. Join.
(48 dc)
Round 5:
Change to yellow. Ch 2. 1 dc in next 3 sts, 2 dc in next st. Repeat around. Join.
(60 dc)
At this stage, your piece should look like a colorful round flower or granny-style medallion. Keep your tension even so the motif stays flat and neat.
Step 2: Expand and Shape the Upper
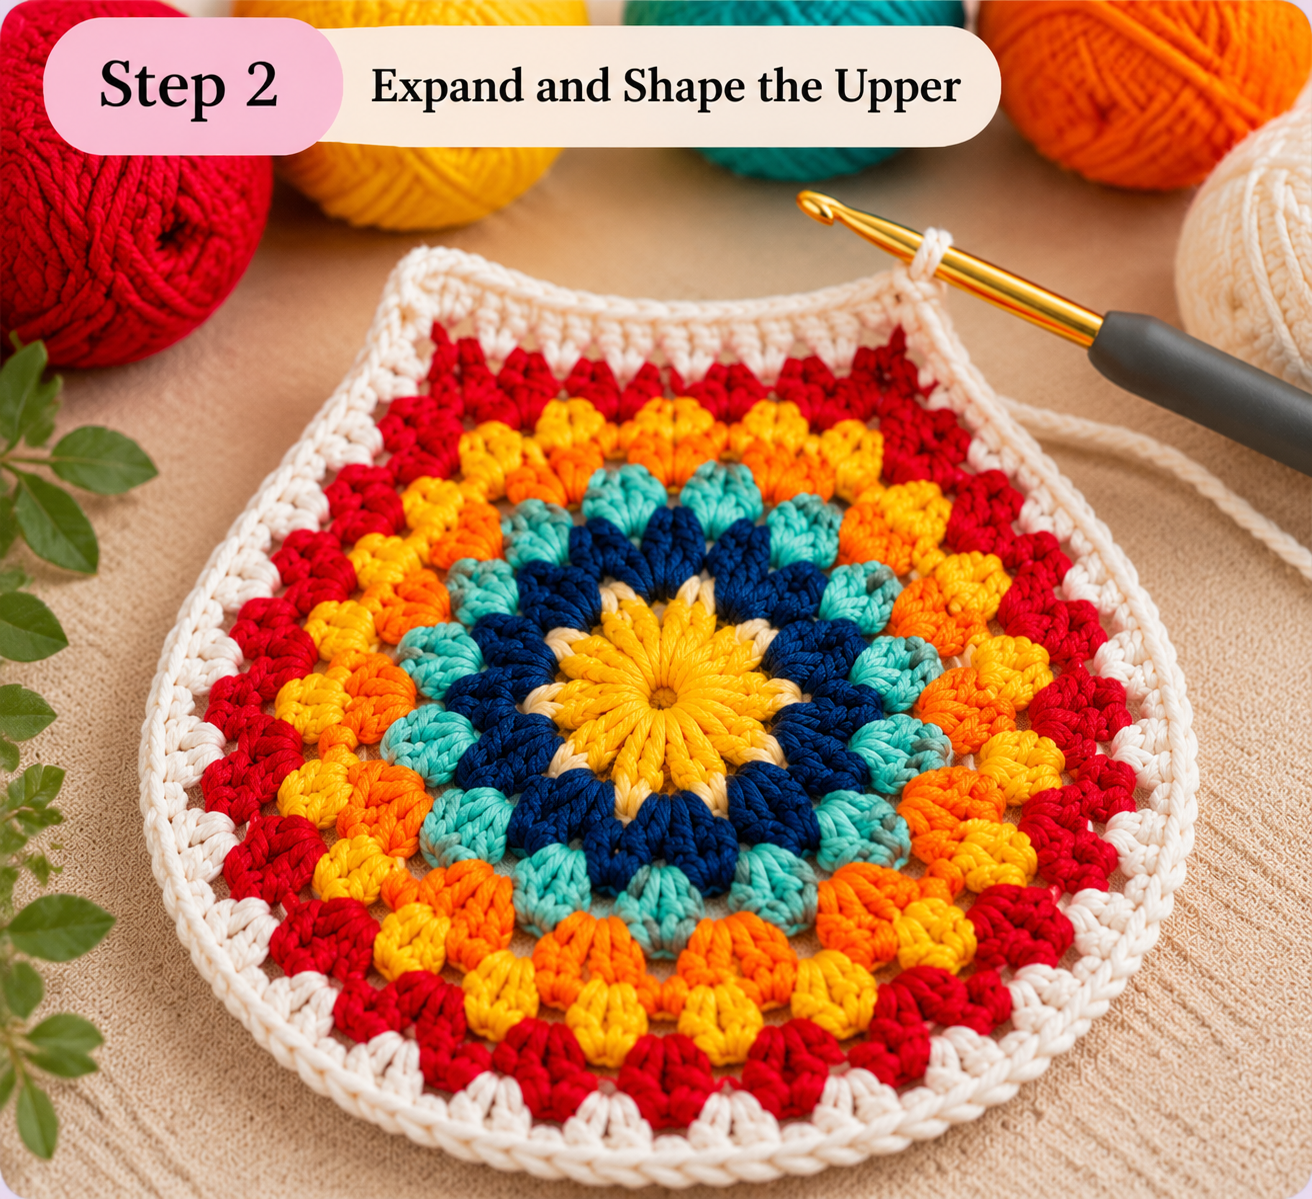
Now you will enlarge the motif and begin shaping it so it becomes wide enough to cover the front of the foot.
Round 6:
Change to turquoise. Ch 2. 1 dc in next 4 sts, 2 dc in next st. Repeat around. Join.
(72 dc)
Round 7:
Change to navy. Ch 1. Work 1 sc in each st around. Join.
(72 sc)
Round 8:
Change to orange. Ch 2. Work dc around, but place an increase at every 6th stitch. Join.
(Approximately 84 dc)
Round 9:
Change to white or cream. Work 1 row of sc around the whole motif.
(84 sc)
After these rounds, the circle should be large enough to cover the toe area. To shape it into a slipper upper, fold the lower portion slightly and work rows across only the front section.
Row shaping:
Attach white yarn and work across about 36–40 center stitches:
- Row 1: sc across, turn
- Row 2: ch 1, sc across, turn
- Row 3: ch 1, hdc across, turn
- Row 4: ch 1, sc across, turn
This creates a slightly extended upper panel that helps the motif sit nicely over the foot.
Step 3: Form the Slipper Front
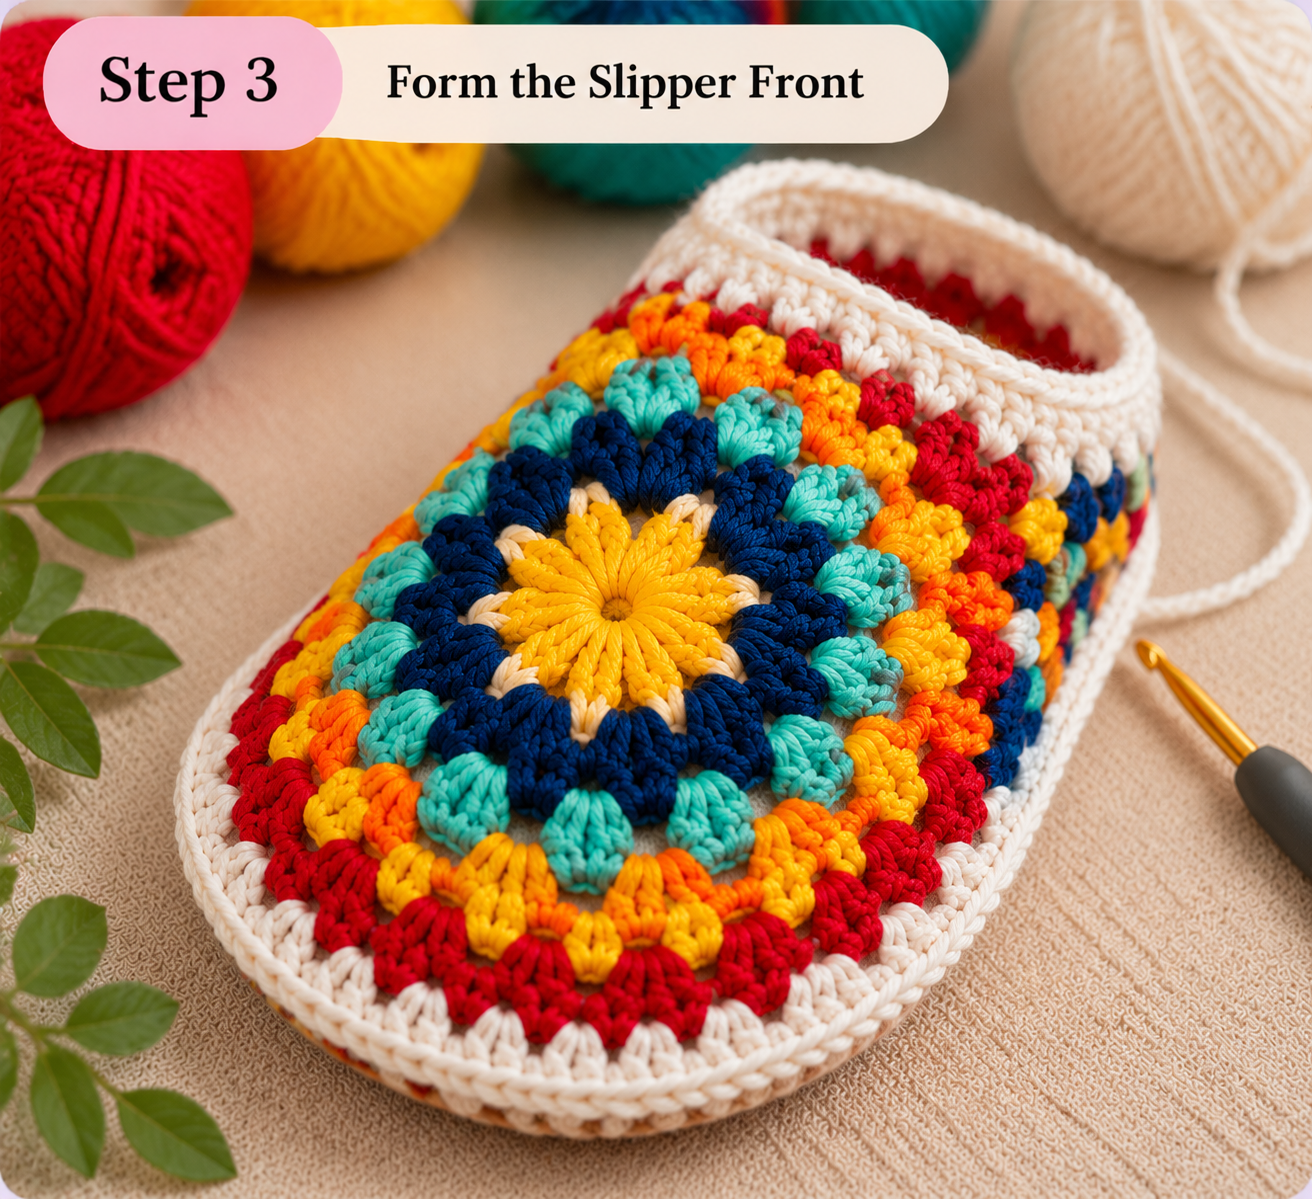
Now the upper must be shaped to look more like a slipper rather than a flat crochet motif. This is where the front becomes structured.
With white yarn, work a neat border around the entire shaped upper:
- 1 sc evenly around the outer edge
- 3 sc in curves if needed
- sl st to join
If you want the upper to look fuller and more polished, you can add another round:
- ch 1
- work crab stitch or regular sc edging around
This edging creates a clean frame around the colorful motif, just like the slippers in your collage.
At this stage, place the upper on your foot or sole and check the fit:
- It should cover the toes comfortably
- It should not pull too tightly
- It should lie smoothly without curling
If needed, add one more shaping row or edging round.
Step 4: Make the Second Upper and Prepare the Soles
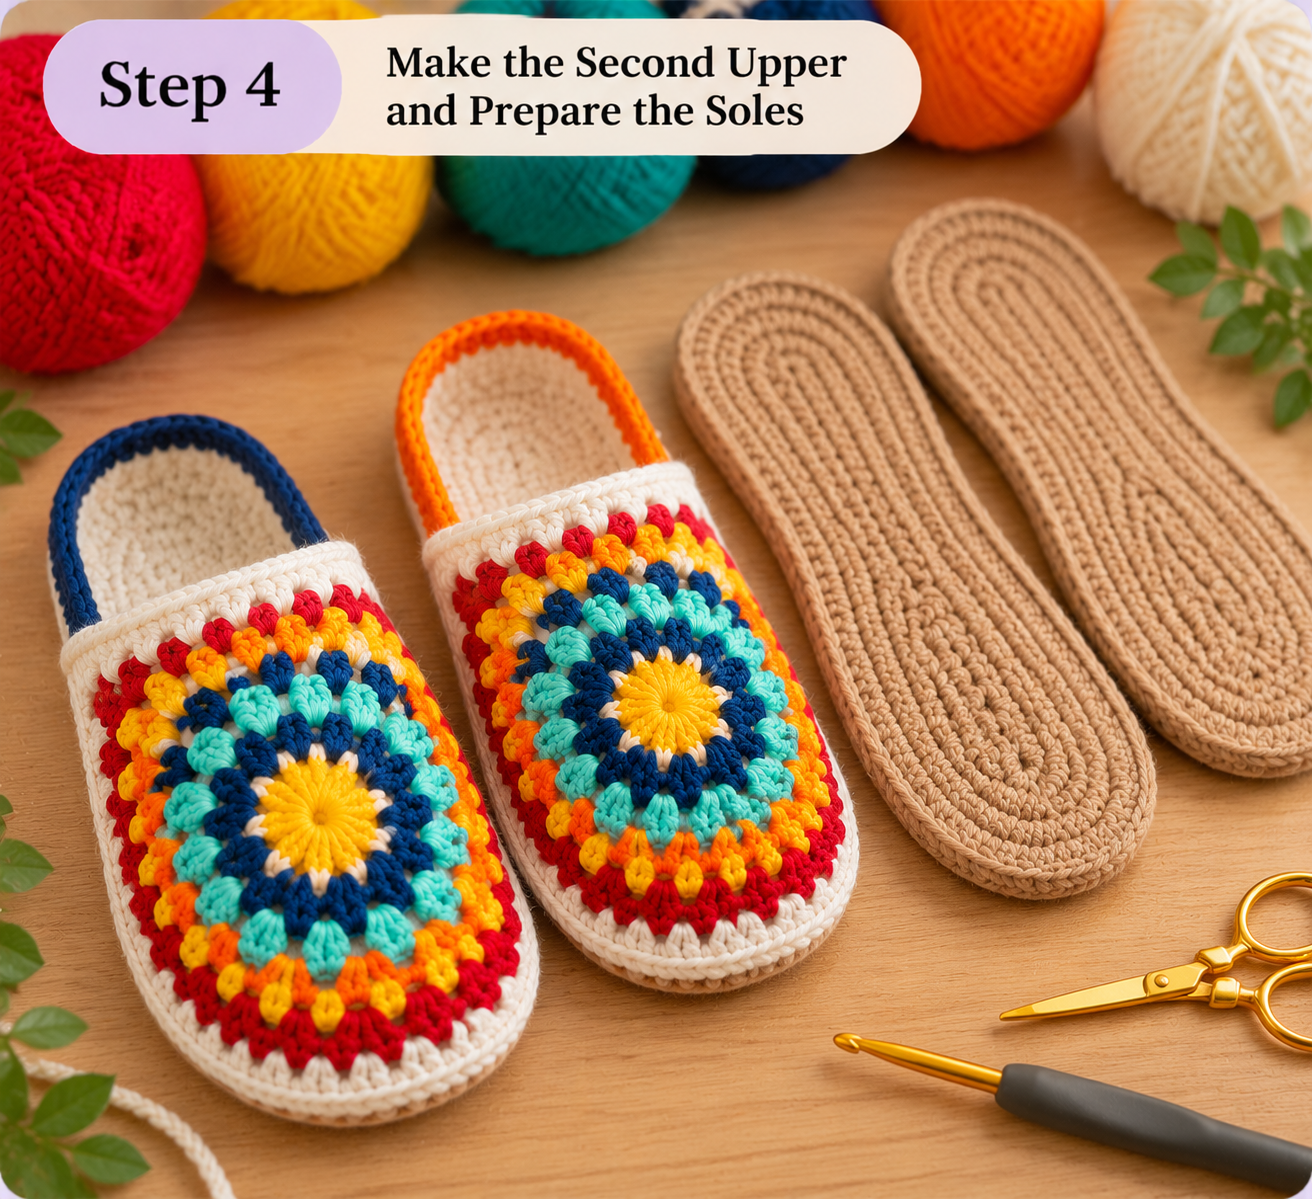
Repeat Steps 1 to 3 to make the second slipper upper. You now need:
- 2 finished uppers
- 2 soles
If you are using ready-made soles:
- Make sure both soles are the same size
- Mark the toe center and side positions
If you are crocheting your own soles, use the pattern below.
Crochet Sole Pattern (make 2):
Foundation:
Ch 21
Round 1:
Starting in 2nd ch from hook, sc in next 19 ch, 3 sc in last ch. Working on opposite side, sc in next 19 ch, 3 sc in last st. Join.
(44 sts approx.)
Round 2:
Ch 1. Sc in next 19 sts, 2 sc in next 3 sts, sc in next 19 sts, 2 sc in next 3 sts. Join.
(50 sts approx.)
Round 3:
Ch 1. Sc around, increasing evenly at the toe and heel curves. Join.
(56 sts approx.)
Round 4:
Ch 1. Work 1 sc around in back loop only. Join.
This gives the sole a cleaner edge.
For a sturdier base, make 2 crochet soles per foot and stitch them together, or add felt underneath.
Step 5: Attach the Upper to the Sole
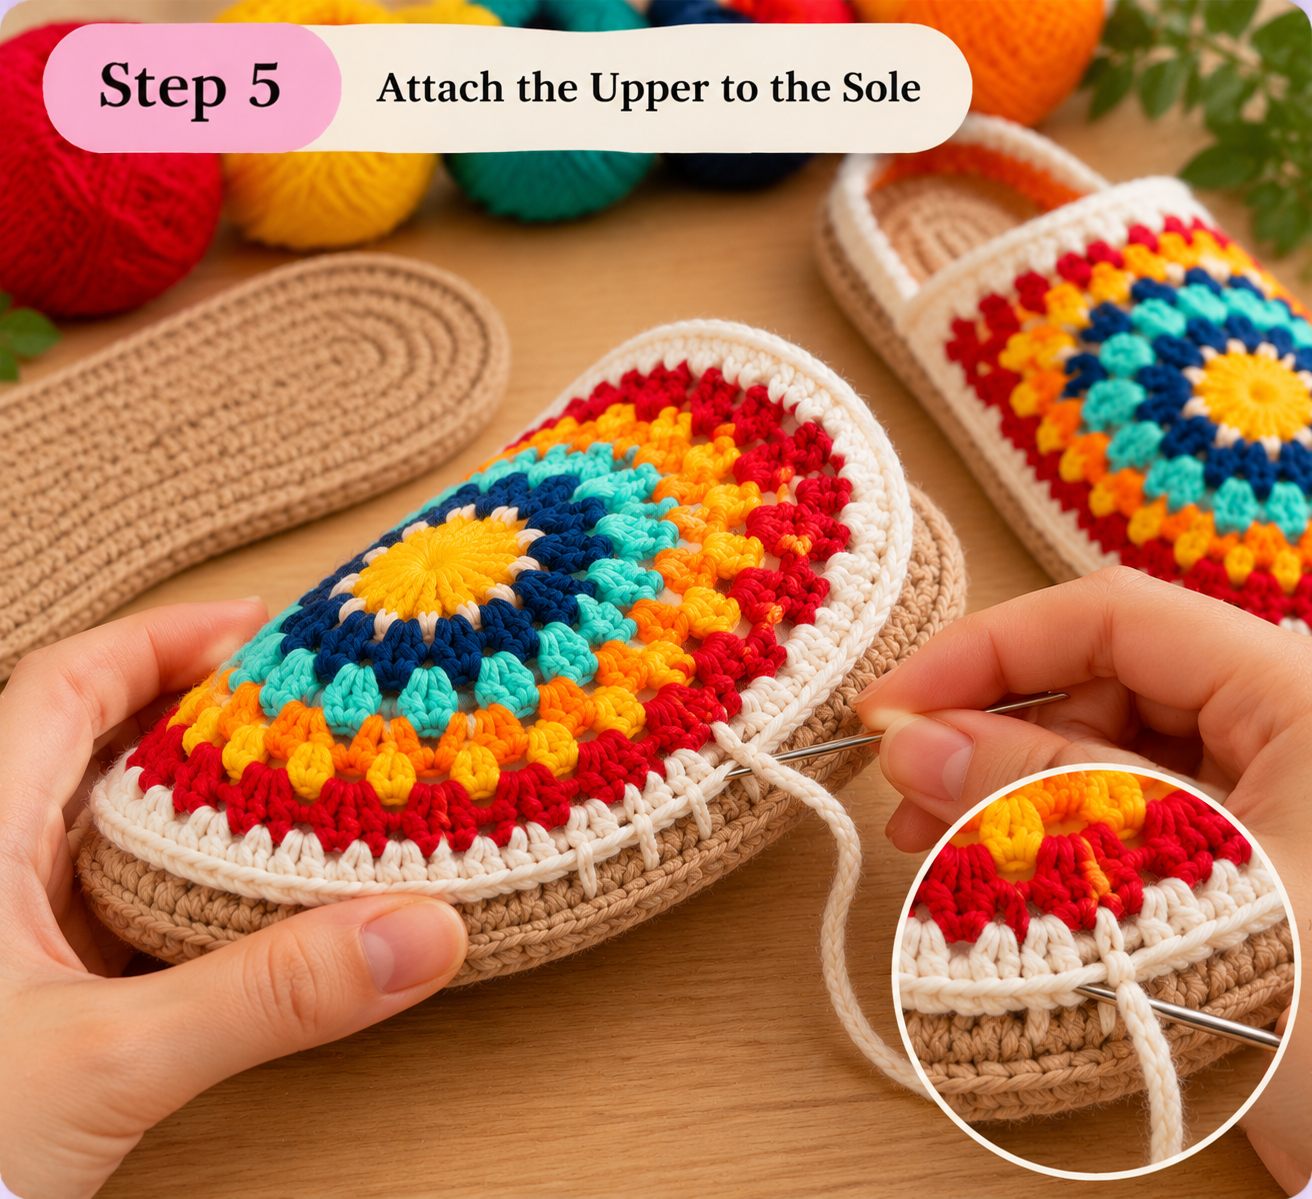
This is the construction step where the slippers really come together.
Place the upper onto the front portion of the sole. Use stitch markers to hold it in place:
- One marker at the center toe
- One on each side
- One at each upper edge
Make sure the upper is centered. It should cover the toe and front sides but leave the back open, like a slip-on slipper.
Using white yarn and a tapestry needle, stitch the upper to the sole with whip stitch or mattress stitch. You can also use a crochet hook and join with sc.
Joining method:
- Start from one side opening
- Stitch along the edge of the upper
- Continue around the toe curve
- Finish on the opposite side opening
Keep stitches even and tight enough for durability, but not so tight that the slipper puckers.
If your sole is thick, stitch through only the crochet edge or pre-made holes if available.
Step 6: Add Finishing Edging and Complete the Slippers
Once the upper is attached, finish the slippers with a neat edging.
Join white or cream yarn at the side opening and work:
- 1 round sc around the slipper opening
- 1 round reverse sc or sl st edging for a tidy finish
If you want a contrast look like the slippers in the image, use:
- navy edging on one slipper
- orange edging on the other slipper
This gives a playful handmade touch while keeping the pair coordinated.
Weave in all loose ends securely. Try on both slippers and check:
- fit
- comfort
- sole placement
- symmetry
If you want extra comfort, add a soft insole, felt lining, or anti-slip dots on the bottom.
Your colorful crochet granny slippers are now complete and ready to use.
Styling and Customization Ideas
These slippers are easy to personalize. You can:
- use pastel shades for a softer look
- make both slippers identical in colour
- use granny-square inspired colour combinations
- add a back strap if you want extra grip
- decorate with buttons, flowers, or pom-poms
For gift-making, pair them with a crochet blanket, mug rug, or tea coaster set for a cozy handmade collection.
Tips for Best Results
- Use soft but sturdy yarn for comfort and shape
- Do not make the upper too loose, or it may slip off
- Check fit before final joining
- Use a solid sole if the slippers are for regular indoor wear
- Reinforce the toe join because it gets the most tension
- Weave in ends very securely for durability
FAQs
1. Are these crochet slippers beginner-friendly?
Yes, they are suitable for adventurous beginners who know how to make basic stitches like chain, single crochet, and double crochet. The shaping and joining require a little patience, but the project is very manageable.
2. What yarn is best for crochet slippers?
Cotton yarn or a soft acrylic blend works well. Cotton gives structure, while acrylic can feel softer and warmer. For indoor slippers, choose yarn that is durable and easy to clean.
3. Can I make these slippers in a different size?
Yes. To make them larger, add one more increase round to the upper motif or lengthen the sole foundation chain. To make them smaller, reduce one shaping round or use a smaller hook.
4. Do I need ready-made soles?
No. You can crochet your own soles, but ready-made soles give more durability and a professional finish. Felt or anti-slip fabric can also be added underneath.
5. How do I stop the slippers from being slippery?
You can sew anti-slip fabric onto the bottom or add non-slip sole paint, silicone dots, or felt with grip backing.
6. Can I wash crochet slippers?
Yes, in most cases. Hand washing is safest, especially if the slippers include a structured sole. If you use washable yarn, let them air dry completely before wearing.
7. How long does it take to make one pair?
For a beginner, one pair may take several hours or one full day. For an experienced crocheter, it can be completed much faster.
8. Can I sell slippers made from this pattern?
Yes, handmade slippers made from your own work can usually be sold. If you post online, use your own photos and mention that they are handmade crochet slippers.
Conclusion
These colorful crochet granny slippers are a wonderful blend of comfort, creativity, and style. The bright circular design on the front gives them a cheerful handmade appearance, while the soft sole and open-back shape make them practical for everyday indoor use. By following the six steps in this tutorial, you can create a beautiful pair for yourself, as a gift, or even for your handmade business.
Take your time with the shaping and joining, enjoy playing with colour combinations, and do not be afraid to personalize the design. Once you finish your first pair, you may want to make many more in different colours and sizes.