
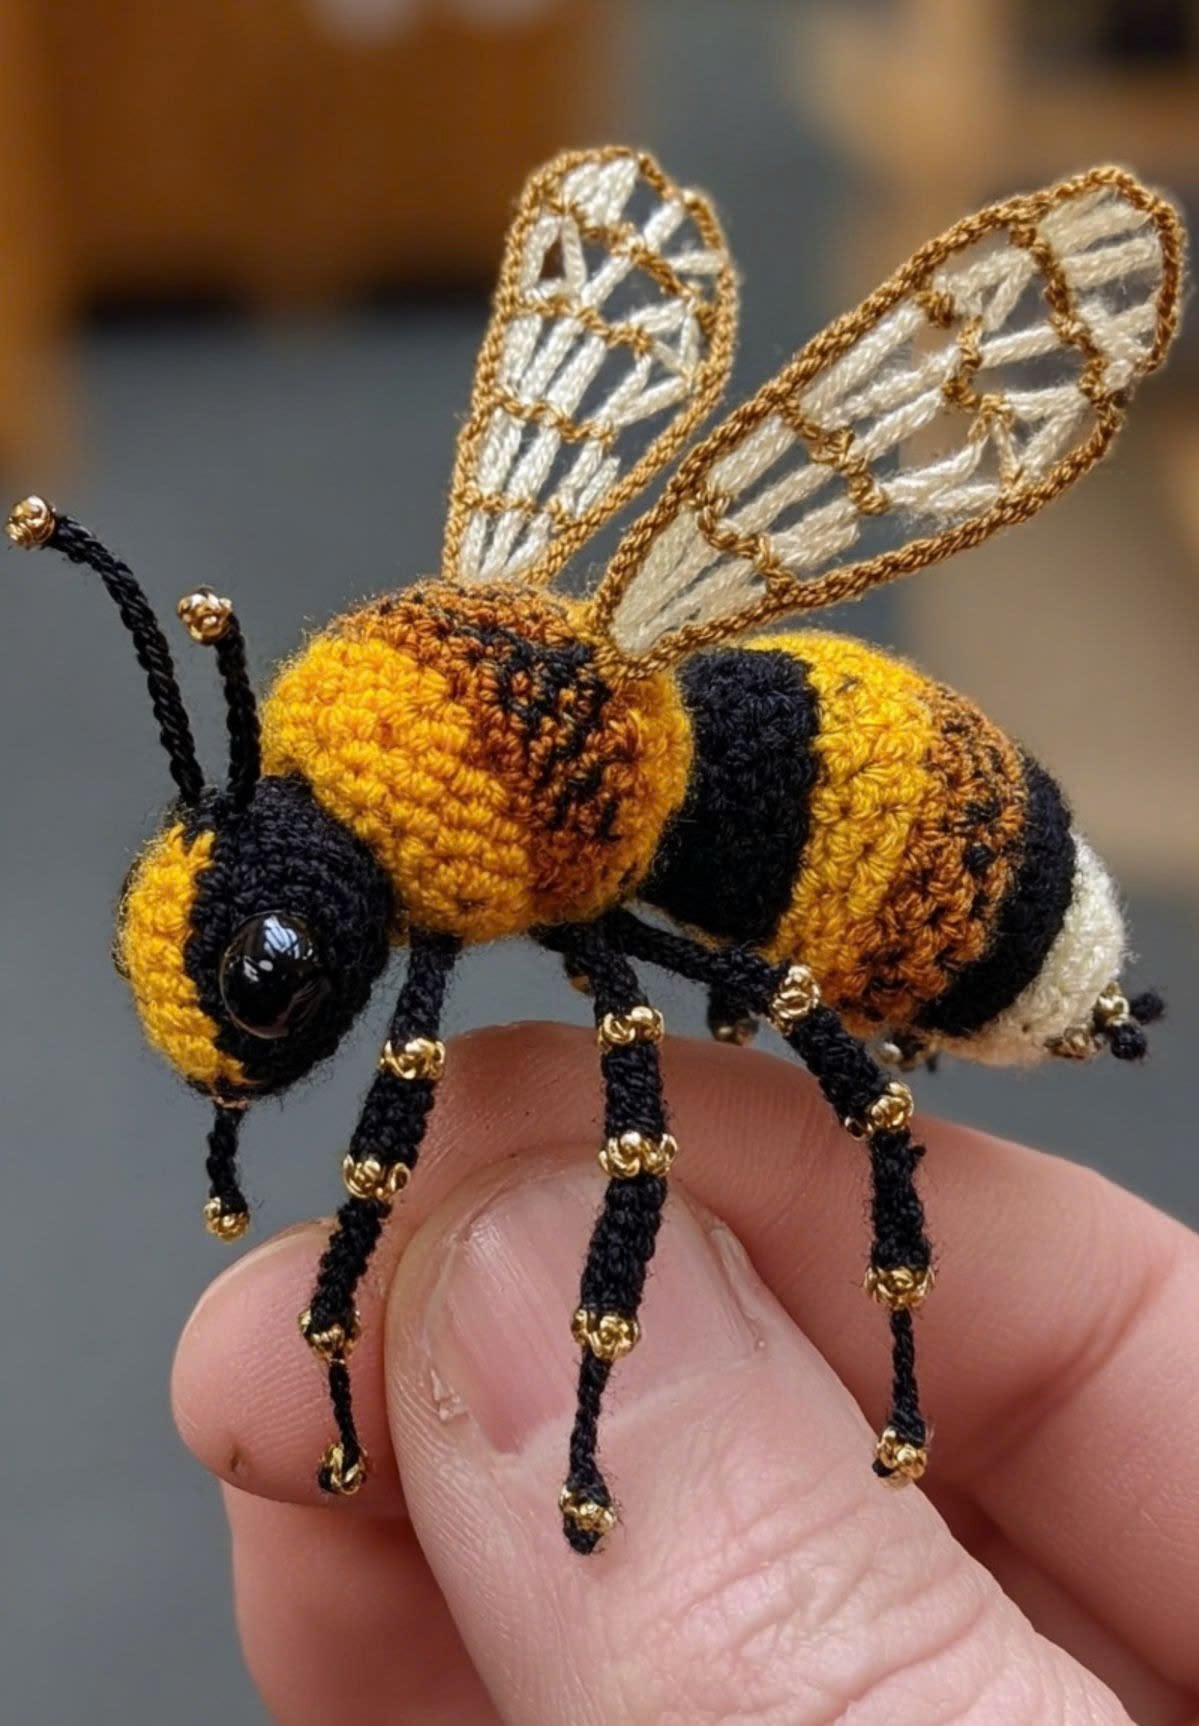
Create a charming handmade crochet bee with this detailed, step-by-step amigurumi tutorial. This project features a golden-yellow body, classic black stripes, delicate decorative wings, tiny legs, antennae, and elegant gold accents.
Whether you enjoy making handmade gifts, crochet decorations, or cute animal-inspired crafts, this bee pattern is a fun project to try. Follow the six construction stages to crochet the main body, add the stripes, make the wings, and assemble the finished bee.
Materials Required
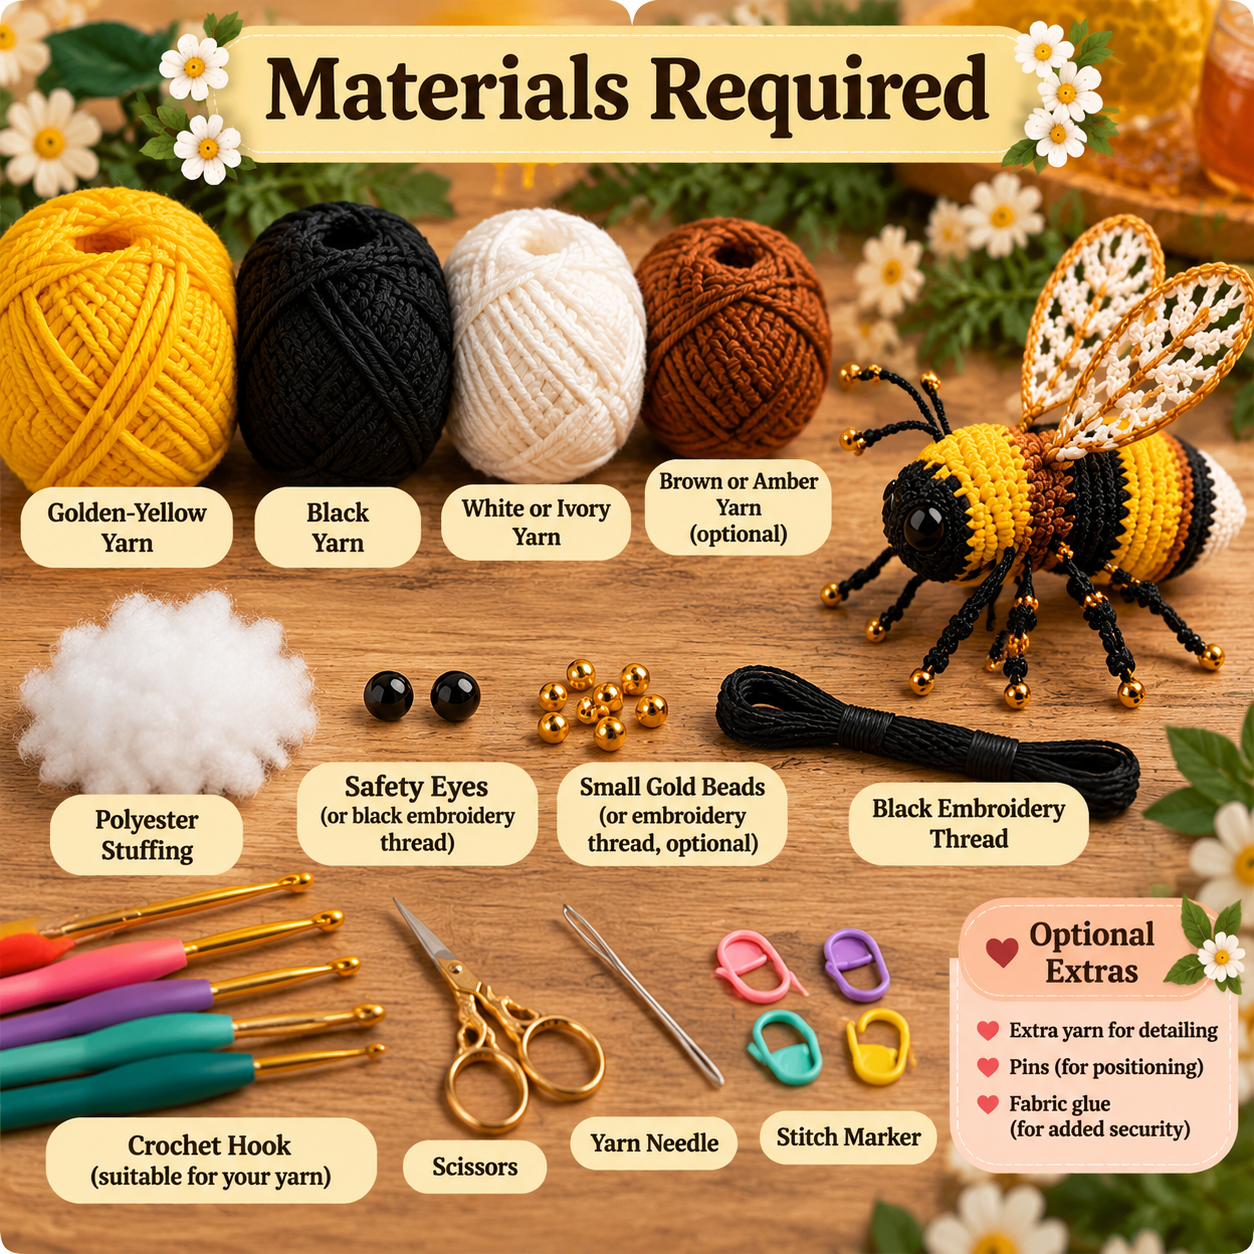
- Golden-yellow yarn
- Black yarn
- White or ivory yarn
- Small amounts of brown or amber yarn
- Black embroidery thread
- Crochet hook suitable for your yarn
- Polyester stuffing
- Yarn needle and scissors
- Stitch marker
- Small gold beads or embroidery thread for decorative accents (optional)
- Two small black safety eyes, or black embroidery thread
Skill level: Beginner to intermediate
Technique: Amigurumi and decorative crochet
Construction: Separate head, body, wings, legs, and antennae assembled together
Step 1: Crochet the Bee’s Head
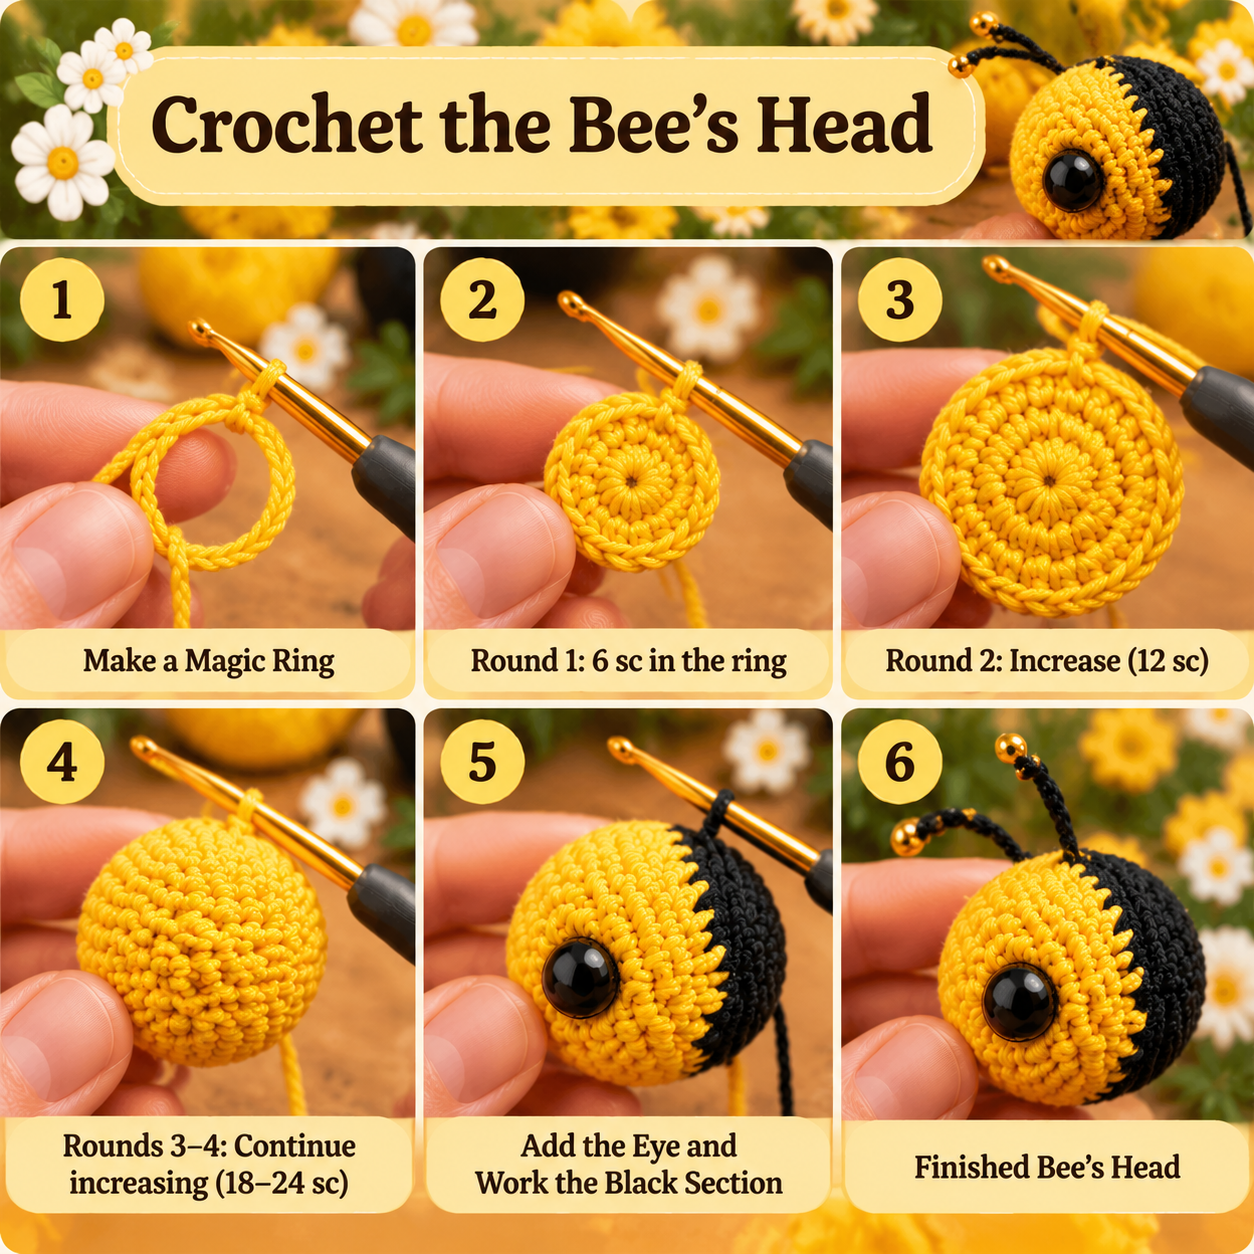
Start with golden-yellow yarn and a magic ring.
Head pattern
Round 1: 6 single crochet (sc) into a magic ring. (6)
Round 2: Increase in every stitch. (12)
Round 3: Repeat 1 sc, 1 increase around. (18)
Round 4: Repeat 2 sc, 1 increase around. (24)
Rounds 5–8: Sc in every stitch. (24)
Round 9: Repeat 2 sc, 1 decrease around. (18)
Round 10: Repeat 1 sc, 1 decrease around. (12)
Add the safety eyes or embroider the eyes and black facial details. Lightly stuff the head, then close the remaining opening.
Step 2: Crochet the Thorax and Main Body
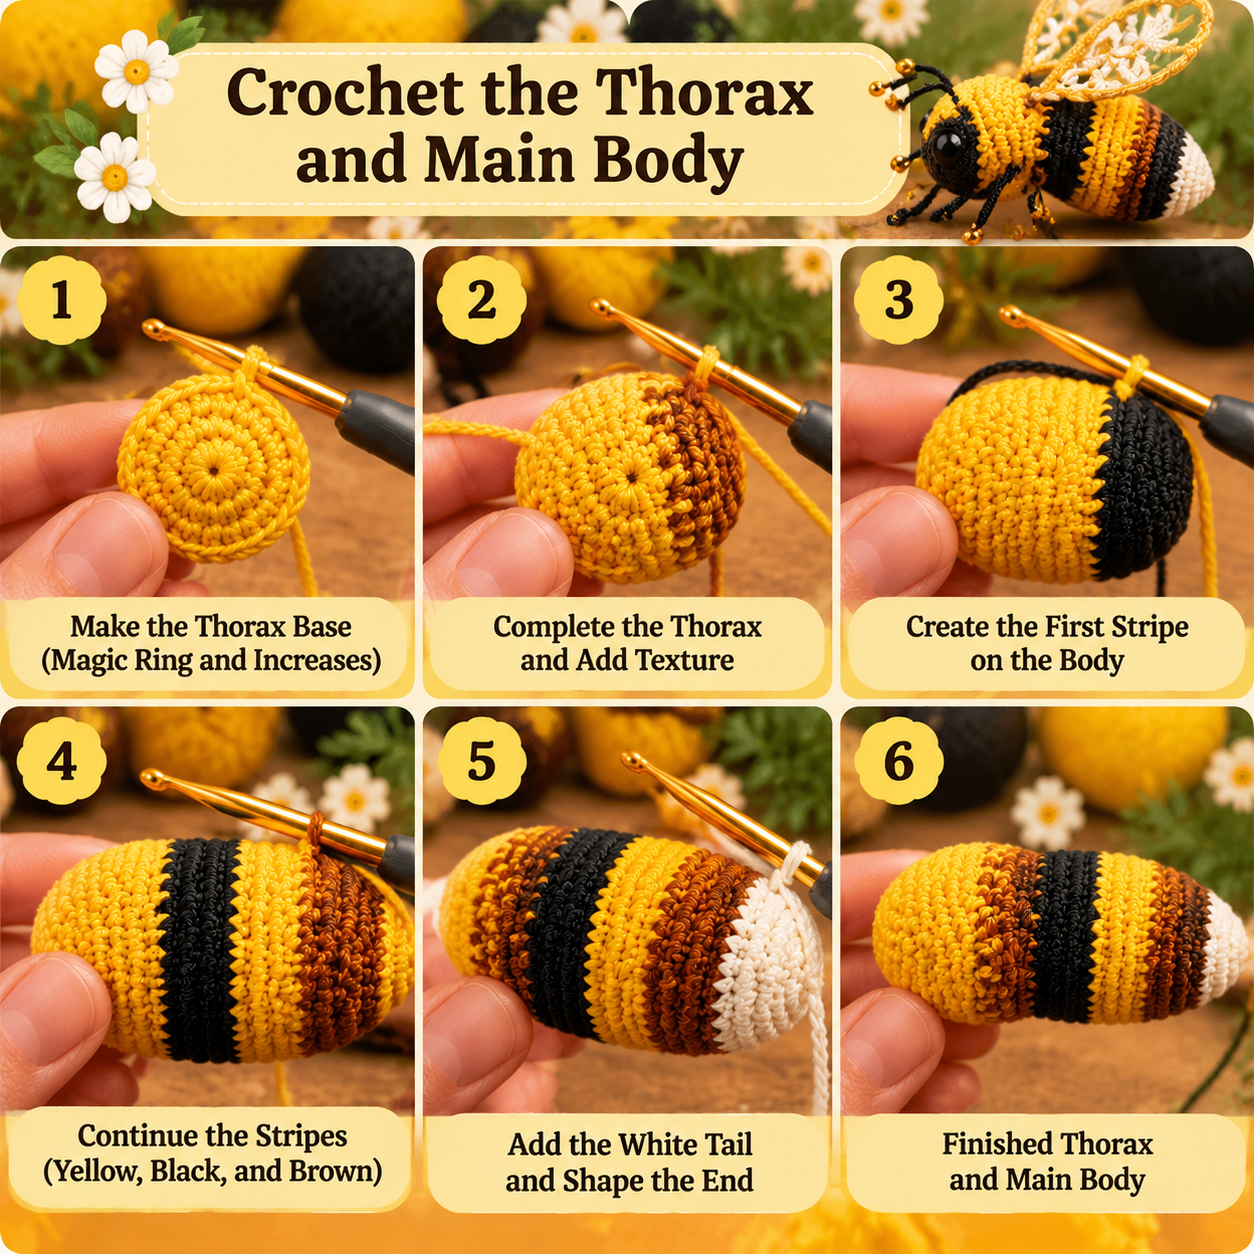
Using golden-yellow yarn, create an oval or rounded cylindrical body.
Round 1: Make 6 sc in a magic ring. (6)
Round 2: Increase in every stitch. (12)
Round 3: Repeat 1 sc, 1 increase around. (18)
Round 4: Repeat 2 sc, 1 increase around. (24)
Rounds 5–7: Sc in every stitch. (24)
Change to black yarn for the first stripe.
Rounds 8–9: Sc around in black. (24)
Change back to yellow.
Rounds 10–12: Sc around in yellow. (24)
Continue alternating black and yellow sections until the body reaches the desired length. Decrease gradually at the rear and add a small white or ivory section for the tail. Stuff the body firmly but evenly before closing.
Note: Adjust the number of stripe rounds to match the proportions of your reference bee.
Step 3: Add the Stripes and Tail Details
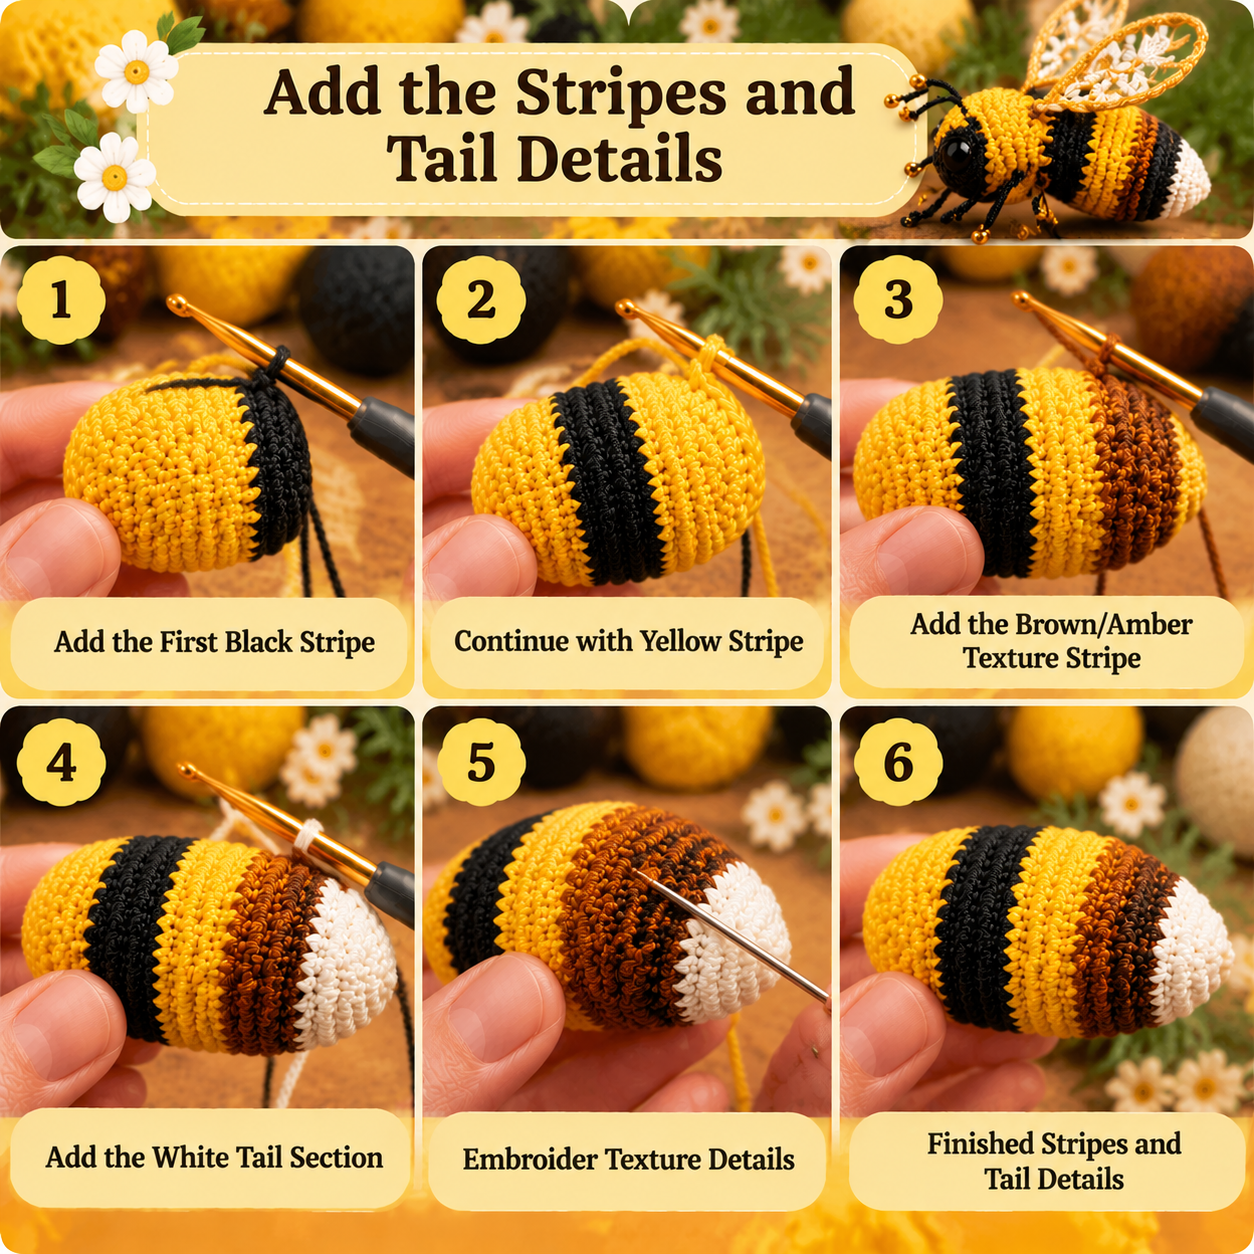
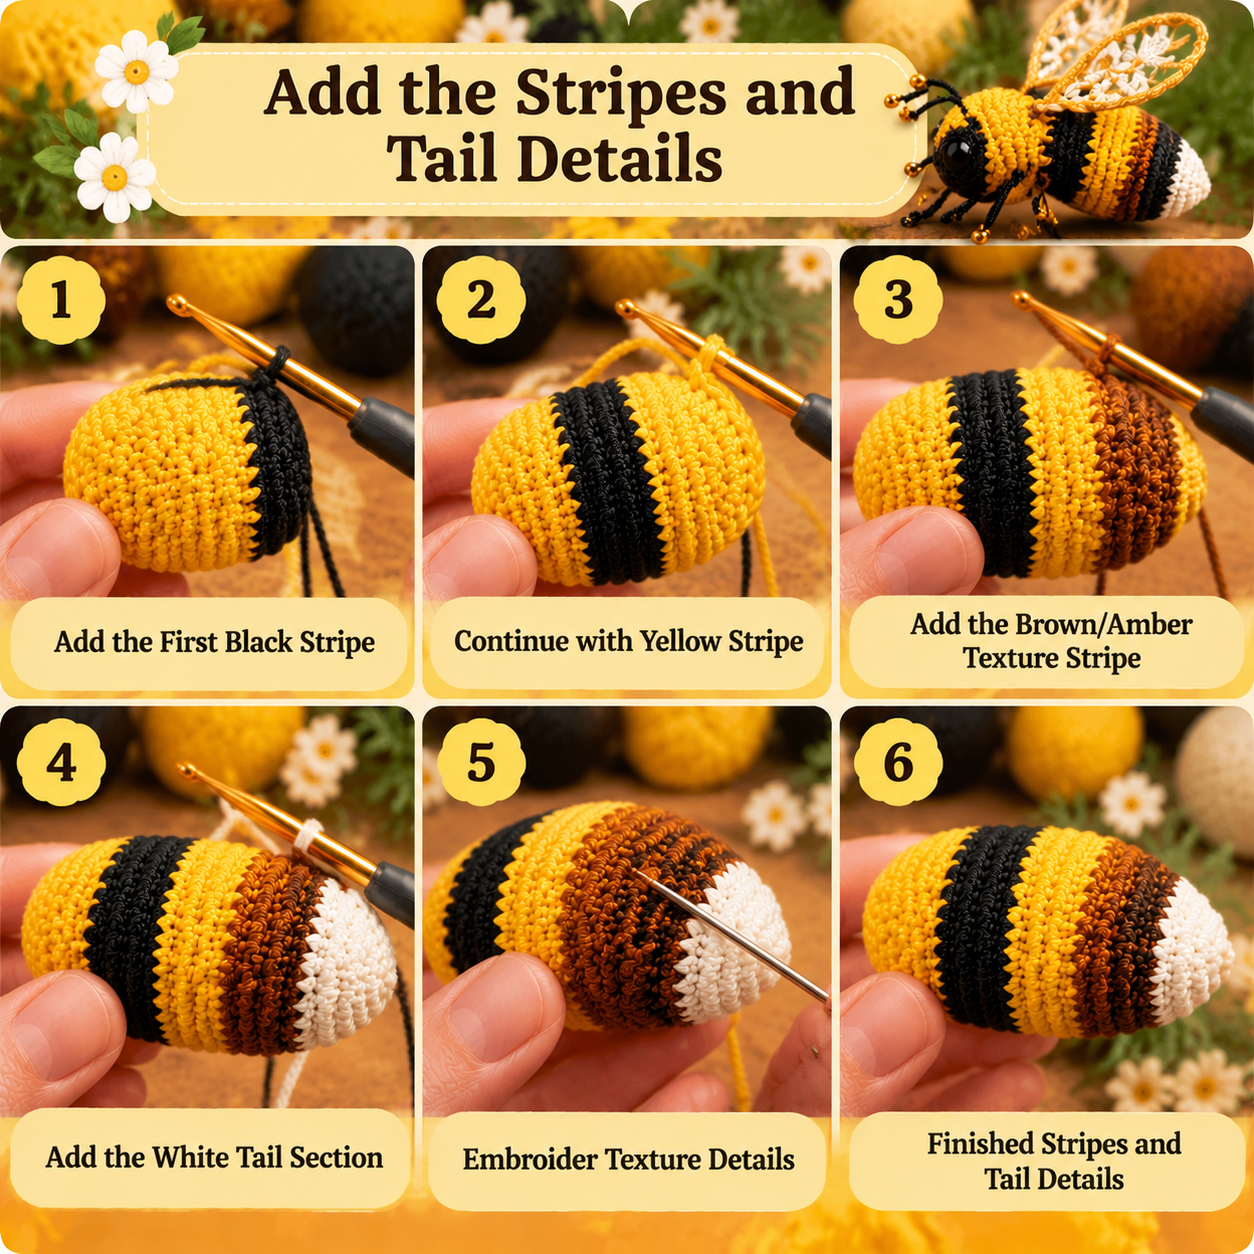
Use black yarn to create clean, contrasting bands around the abdomen. Keep the color changes aligned and hide yarn ends neatly inside the body.
For the warm amber-brown texture on the upper body, embroider small irregular stitches using brown yarn. Add a white or ivory tail section at the rear.
Use a yarn needle to tidy the color transitions and ensure the bee has a smooth, rounded silhouette.
Step 4: Crochet the Legs and Antennae
Legs: Make six slim black crochet cords or chains. For each leg, chain approximately 8–12 stitches, then work slip stitches or single crochet along the chain if a thicker leg is desired. Secure the ends and attach three legs on each side of the body.
Antennae: Make two short black chains or narrow cords. Attach them to the top of the head and shape them gently outward.
For the reference-inspired finish, add tiny gold beads at selected leg joints and antenna tips. Secure all decorative pieces firmly. For toys intended for young children, embroider the accents instead of using small detachable beads.
Step 5: Crochet the Decorative Wings
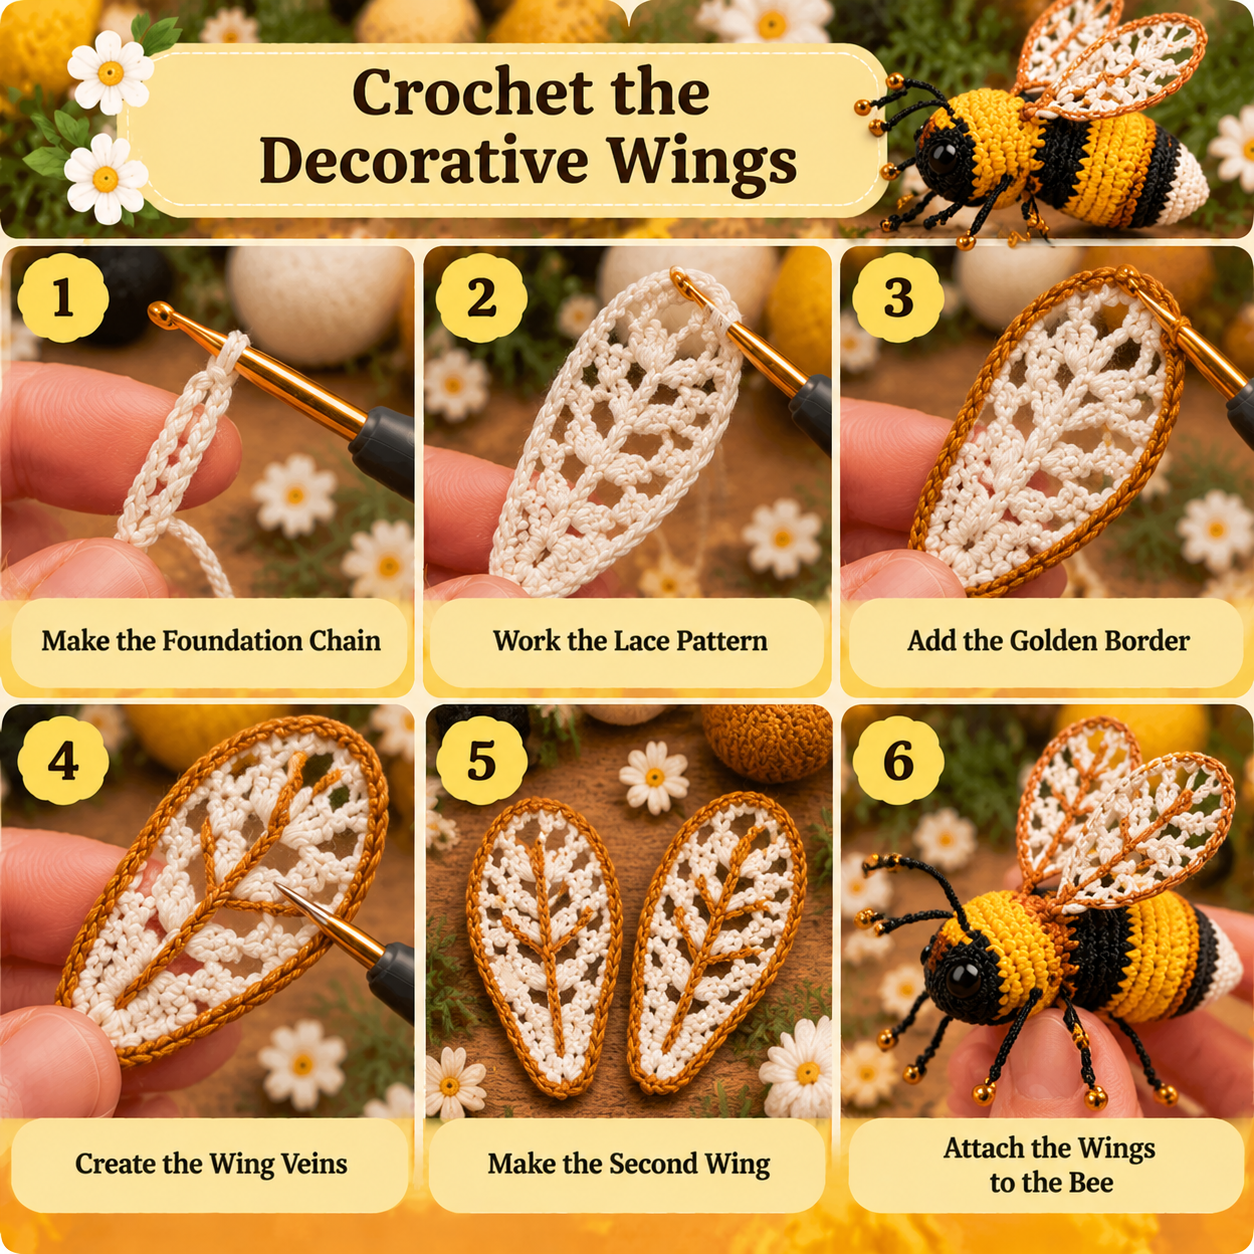
Make two matching wings using white or ivory yarn and a fine crochet hook.
Begin with a short chain, then work around it with single crochet and taller stitches to form a long, tapered oval. Use chain spaces and double crochet stitches to create an open, delicate lace pattern.
Work a narrow border around each wing in golden-brown yarn. Add a few connecting chain stitches across the wing to create a vein-like design.
Make the second wing to match the first. Block both wings gently if needed, then sew them securely to the upper back of the bee.
Step 6: Assemble and Finish the Bee
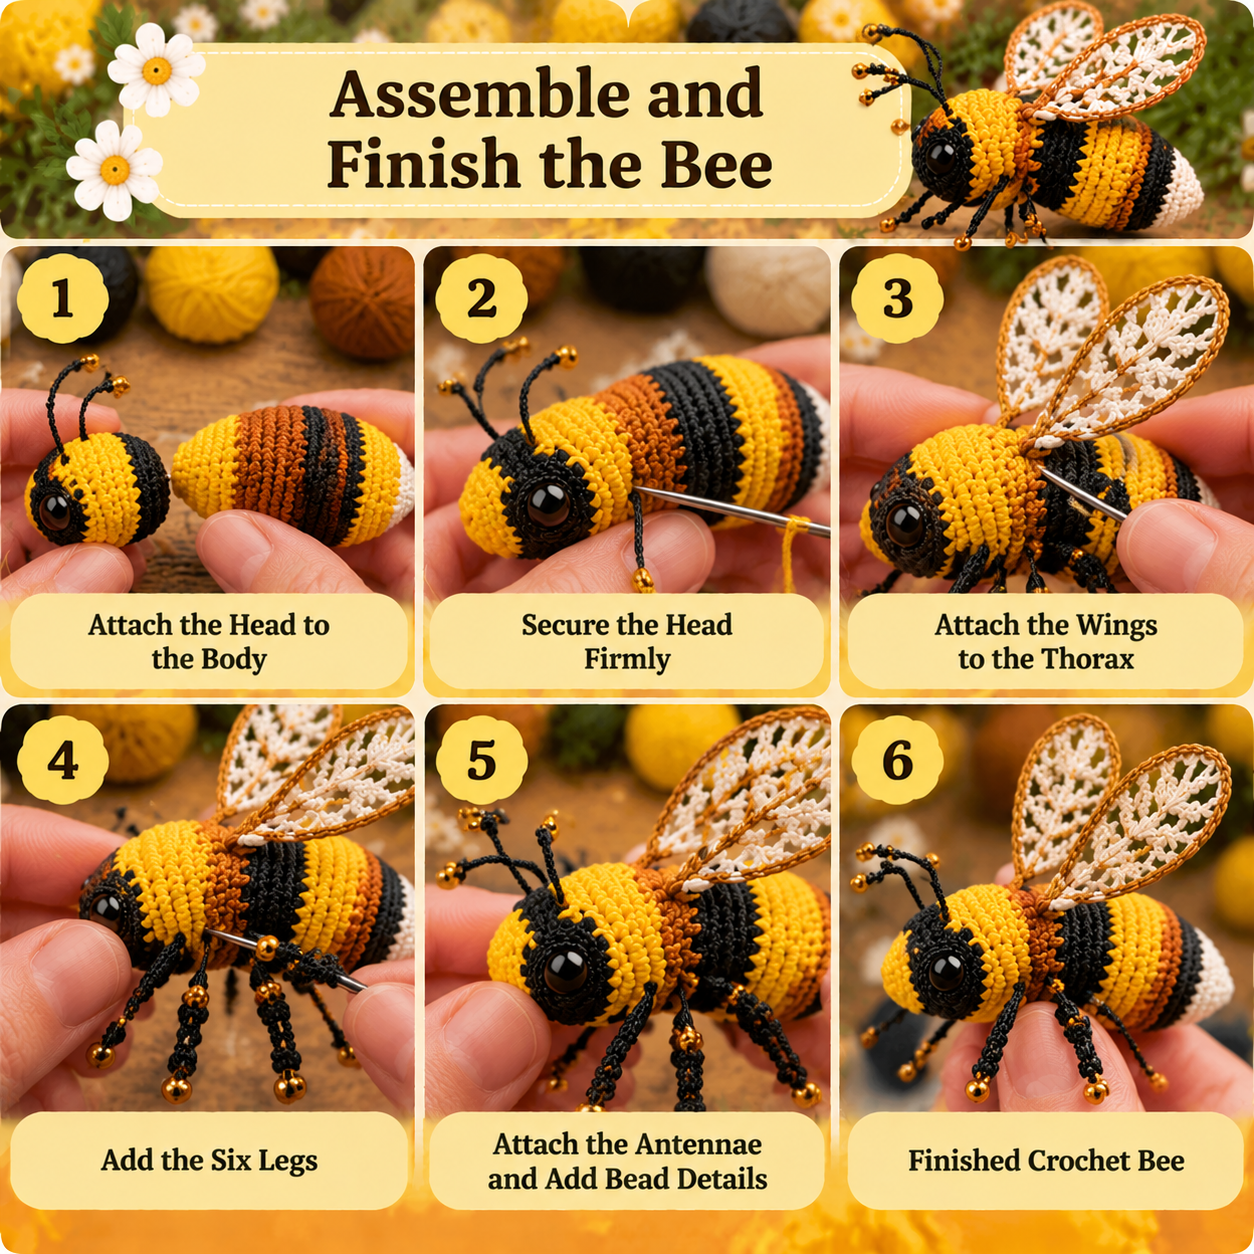
Attach the head to the front of the body, keeping the face angled slightly downward. Sew the wings onto the upper back, ensuring they stand upright and remain balanced.
Position the six legs evenly underneath the body and attach the two antennae to the head. Add any optional gold accents, embroider facial details, and weave in all loose ends.
Check the finished bee from the front, side, and back. Adjust the wings and legs until the bee has a balanced, realistic handmade appearance.
Your crochet bee is now ready to display, gift, or photograph as part of your handmade crochet collection!
Helpful Tips
- Use consistent tension for a neat amigurumi finish.
- Count stitches after every increase or decrease round.
- Stuff the head and body gradually to avoid lumps.
- Keep both wings similar in size and shape.
- Secure every sewn component carefully.
- Use embroidered details instead of small beads for child-safe versions.
Frequently Asked Questions
Is this crochet bee pattern suitable for beginners?
It is suitable for beginners who know basic crochet stitches, although the lace wings and small decorative details may require extra practice.
What yarn should I use?
A smooth cotton or acrylic yarn is a practical choice for defining the stitches and creating neat color changes.
Can I change the bee’s colors?
Yes. You can use different shades of yellow, black, cream, or brown to create your own variation.
How do I keep the wings in shape?
Use even tension, a firm border, and gentle blocking where appropriate. Sew the wings securely to the body.
Can I sell bees made using this pattern?
You may sell your finished handmade bee, subject to any applicable pattern rights and marketplace rules. If you publish or sell the written pattern itself, make sure it is your own original work or that you have permission to distribute it.